This project demonstrates the end-to-end process of identifying, analyzing, and managing security weaknesses across a network infrastructure. Using Greenbone’s OpenVAS (Open Vulnerability Assessment System), you will perform automated security assessments on both internal and public-facing assets to determine their risk profile based on likelihood, impact, and existing controls.
Cybrary is a well established and free IT training platform with several intuitive labs to explore
A paid subscription with more advanced labs is available as well outside the scope of this platform
Head to https://www.cybrary.it to create a free account for learning available on their platform
Head to Vulnerabillity Scanner Basics to complete it yourself or you can perform it on homelab below
Quick Links:
Requirements:
• Windows PC w/ Internet Connection
• USB Flash Drives w/ at least 64GB Capacity
• 2 Unused PCs w/ at least 4GB of Memory
1. Vulnerability Scanner Overview
In this lab, we're going to talk about vulnerability scanning, review reports, and perform our own scans
Before we can conduct scans on live systems, let's take a moment to establish some foundational concepts

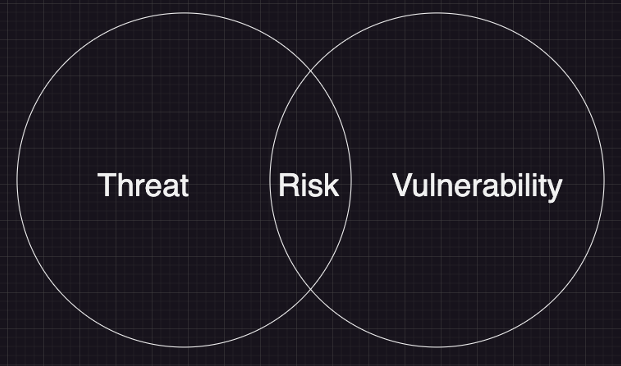
A Vulnerability is a weakness or flaw in an asset or computer system that could potentially be exploited
The key word here is potentially, a vulnerability alone does not automatically mean that there is harm
Vulnerabilities come in many forms, including misconfigurations, unpatched software and exposed services
In this lesson on Vulnerability Scanners, you will inspect to some of the common vulnerabilities types
A threat is the potential for a threat actor to exploit a vulnerability and cause damage, harm, or loss
A risk is the potential for loss or harm when a threat exploits a vulnerability, intentionally or not
Vulnerabilities only become significant when an existing threat can exploit them. When a threat and a
vulnerability align, risk emerges, the key metric that determines which vulnerabilities require attention
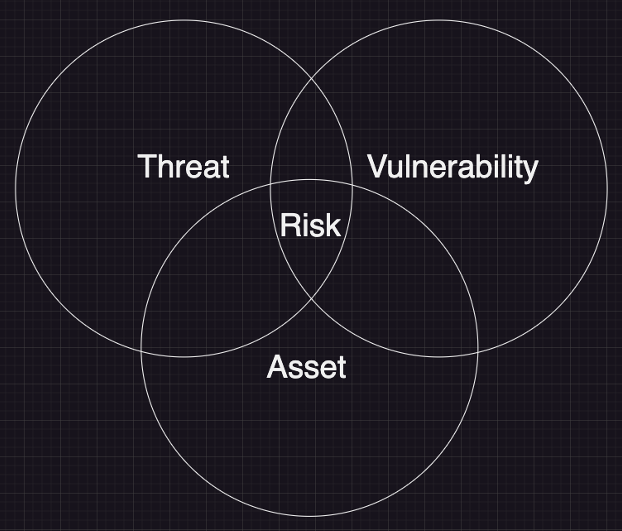
Once we identify a vulnerability and a corresponding threat, the next step is to assess the degree of risk
Risk is not just about the presence of it, it requires a deeper analysis using three primary key factors:
• Likelihood - How probable is it that a threat will exploit a vulnerability?
• Impact - What are the consequences if the vulnerability is exploited?
• Controls - What defenses are in place to reduce the likelihood or impact?
While both likelihood and controls are qualities of threats and vulnerabilities, impact relates to assets
Let's do an analogy to better paint a picture. Consider some unlocked cabinets full of valuable jewelry:
• Vulnerability (Input) - The unlocked cabinet represents a weakness
• Threat (Input) - A burglar in the area looking for valuables, a threat which could exploit the weakness
• Risk (Output) - The likelihood an impact of a burglary occuring:
• Are you in a high-crime neighborhood? (Likelihood)
• Is the jewelry valuable (24-karat gold vs. rhinestones)? (Impact)
• Do you have an alarm system or a guard dog? (Controls)
The degree of risk depends on the context, environmental factors, security controls, and the assets value
In the example provided above, the jewelry owner has a few options available to reduce the risk, such as:
• Lock the cabinet to remove the vulnerability
• Take in a guard dog to act as a security control
• Move to a lower crime rate neighborhood to reduce exploitation likelihood
But even then, risk is not static. Even if there's no threat today, a vulnerability is worth addressing
New threats emerge constantly, so proactive risk management is crucial. And so is vulnerability scanning
Nothing we have described, not threats, controls, impact or likelihood, matters without a vulnerability
A vulnerability is a tree as big as an asset, that grows by threat and will shrink through controls, and
dissappears when you remove it entirely. And you find them by looking for them, and by scanning for them
Vulnerability Scanning is an automated security assessment technique used to identify weaknesses and flaws
in a computer system that could potentially be exploited by a malicious actor. The primary targets of a
vulnerability scan are assets, which can be defined as any resources an individual considers as valuable
• Systems critical to business operations (databases, servers, cloud infrastructure, etc.)
• Sensitive data that an organization is obligated to protect
• Network devices and endpoints that provide access to company resources
Organizations use Vulnerability Scans to:
• Assess the effectiveness of existing security controls
• Identify weaknesses and apply corrective measures
• Ensure adherence to industry standards and regulations
As you might have imagined, vulnerability scanning is done utilizing vulverability scanning applications
However, keep this in mind: vulnerability scanners are tools, while vulnerability scanning is a process
And, in fact, all of our risk inputs can be modeled as processes. With that we could reimagine our diagram
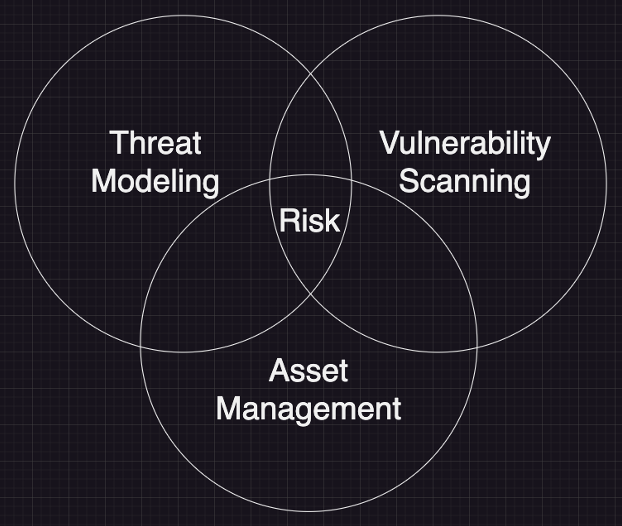
Before we spoke about mesuring risk. Now our digram represents how to manage risk. Moving on to scanners
There are many vulnerability scanners available, ranging from enterprise-grade solutions to open-source
Some have sharper focuses that others, and others are meant to be all-inclusive vulnerability managers
• Enterprise Scanners:
• Tenable Nessus - Comprehesive commercial vulnerability scanner with extensive plugin coverage
and compliance auditing
• Rapid7 Nexpose - Integrated vulnerability scanner with real-time risk assessment and automation
features
• Qualys - Cloud-based vulnerability management platform offering continuous scanning and some
compliance tracking
• OpenVAS - Open-source vulnerability scanner with an extensive vulnerability database and includes
customizable scan profiles, and a web-based interface
• Specialized Scanners:
• Burp Suite & OWASP ZAP - Web application security testing tools including active scanning, proxy
interception, and vulnerability detection
• Snyk - Developer-focused tool that identifies and fixes vulnerabilities in code dependencies,
containers, and infrastructure as code
• Nikto - Web server scanner that detects misconfigurations, outdated software security weaknesses
In this lab, we will be using Greanbone's OpenVAS (Open Vulnerability Management System) to perform scans
2. Install Parrot Security OS
Parrot Security OS is Linux Distribution based on Debian which is designed with Security Testing in mind
It includes a full portable lab for all kinds of Cybersecurity Operations, including Penetration Testing
The core design principles of Parrot Security are Lightweight, Modular, Up-to-Date, Cloud Ready and Secure
Parrot Security describes itself as the ultimate framework for Cyber Security Operations and DevSecOps
Parrot Security OS' built in penetration testing tools and anonymization settings make it ideal for this
In this lab we will use the Parrot Security OS to perform Vulnerability Scans and uncover host weaknesses
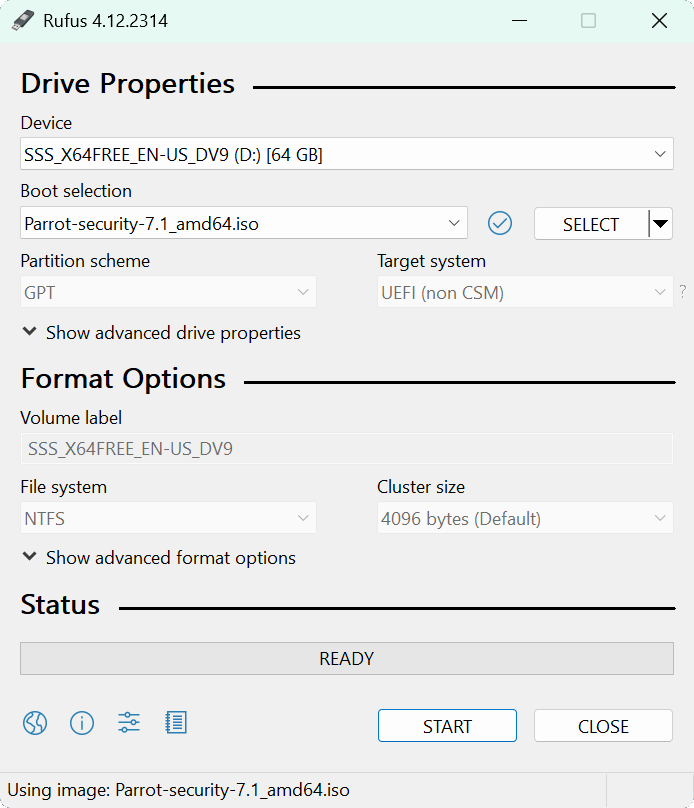
Download Parrot Security OS: Parrot Security Edition ISO
Download Rufus Disk Imaging Software: Rufus Official Download
Insert USB Flash Drive, run rufus.exe, select target drive, select the Parrot OS Image, then click start:
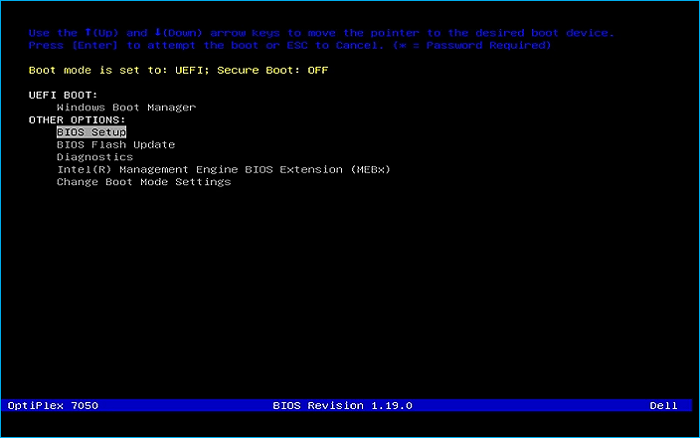
Remove the USB Flash Drive and Insert into unused PC. Start PC and press the hotboot key at the startup:
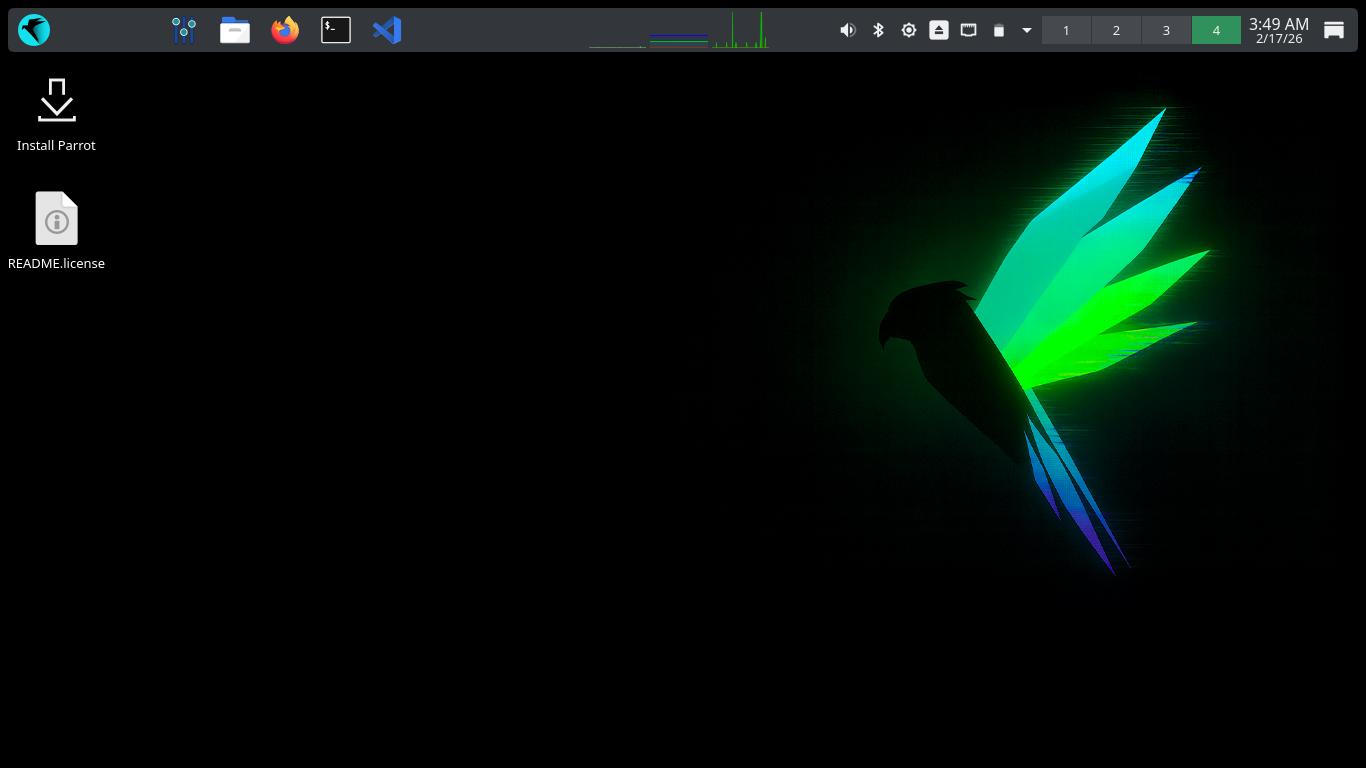
Once our live operating system boots, you will be taken to the dektop environment for Parrot Security OS
Hit next to continue with the defaults for language, location, and keyboard layout, then select Erase Disk
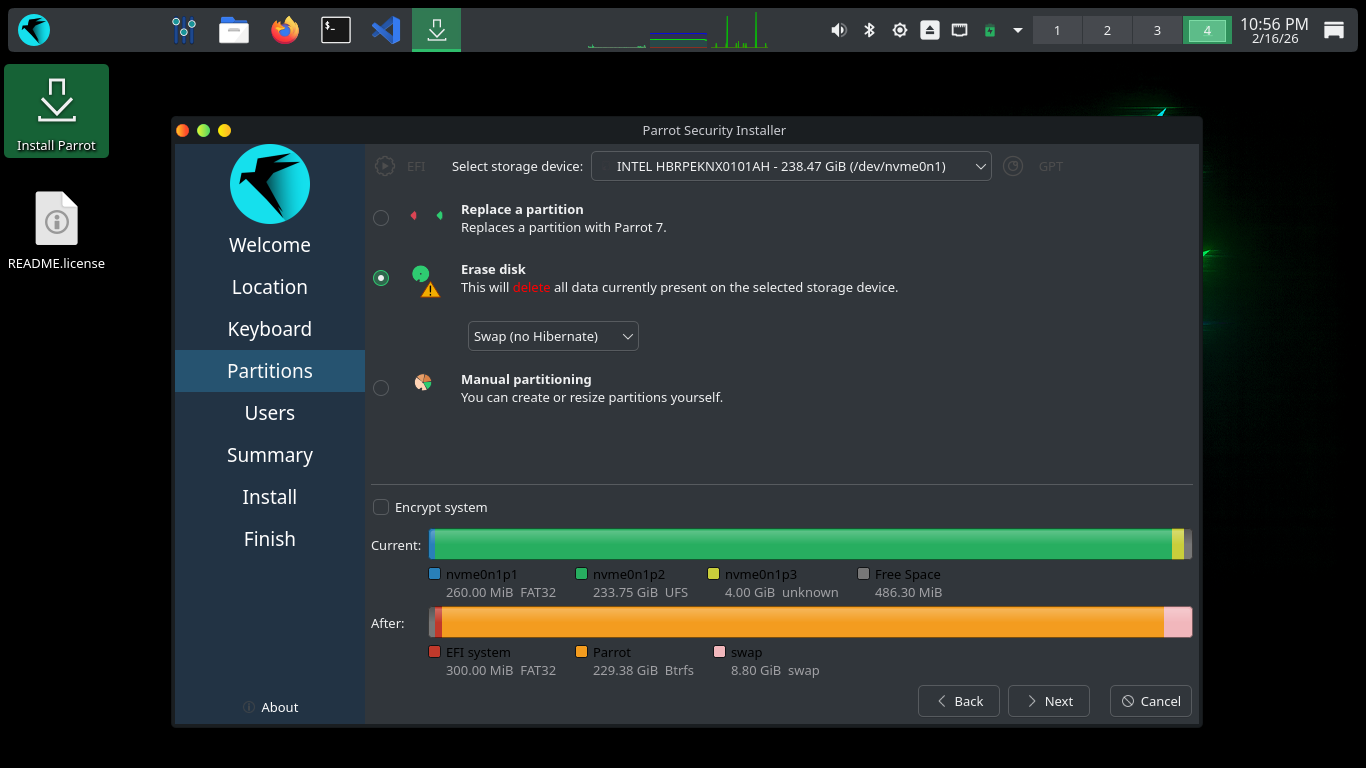
Select Swap (no Hibernate) then click next. Enter your Full Name, Login username, hostname and password
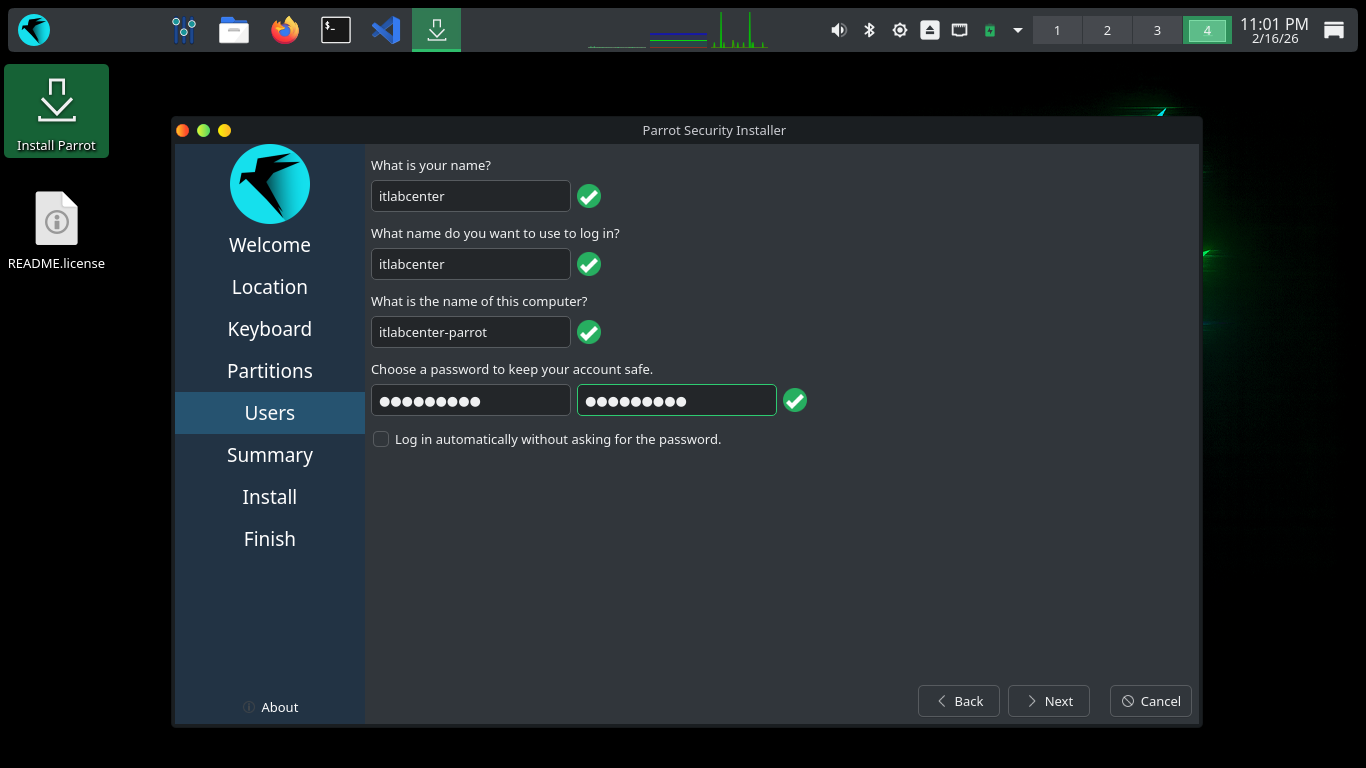
Click the next option to continue, then click the install option to write the changes to disk and install
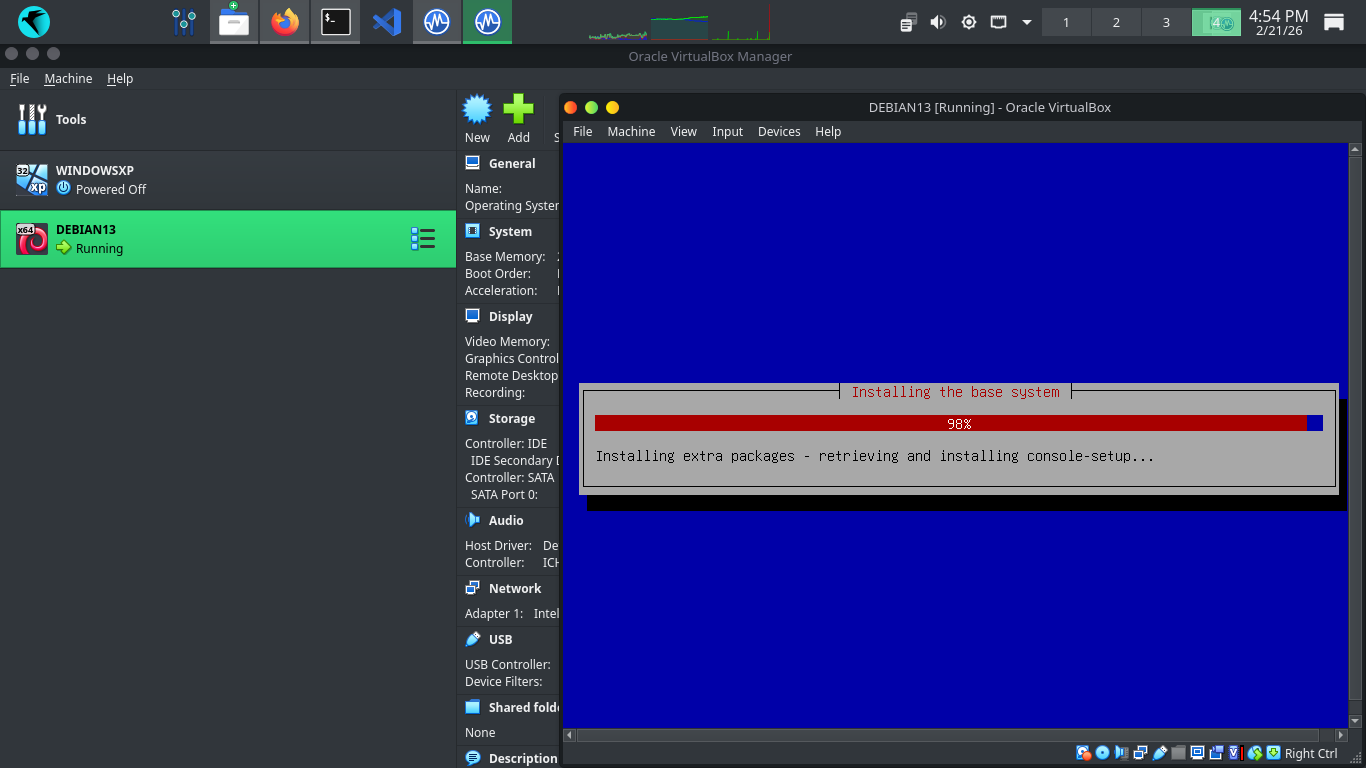
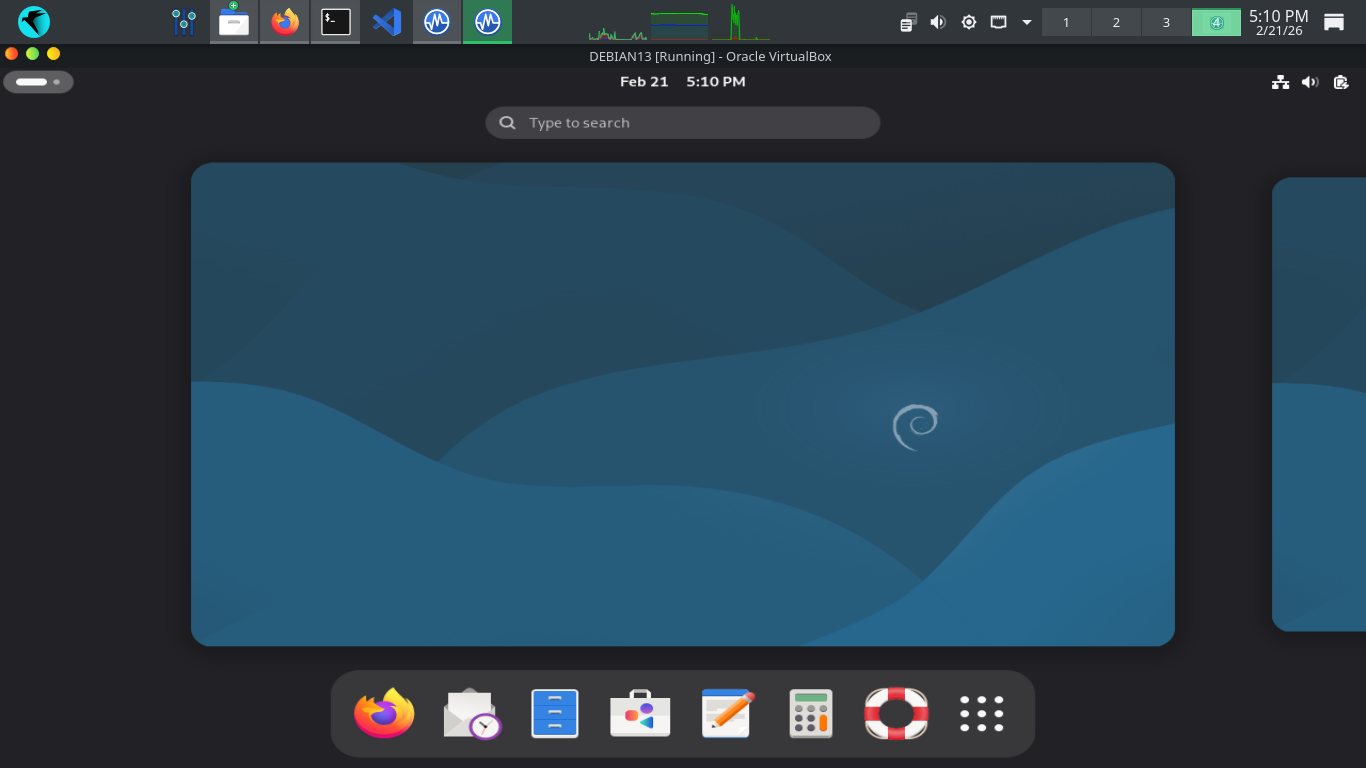
Once the installer has completed, your system will boot into it's new desktop environment for this lesson
3. Install Lab Tools
In this lab we will use the GreenBone Vulnerability Management platform to analyze and perform our scans
During this lab, we will work primarily from the terminal, which can be found in the upper left hand dock
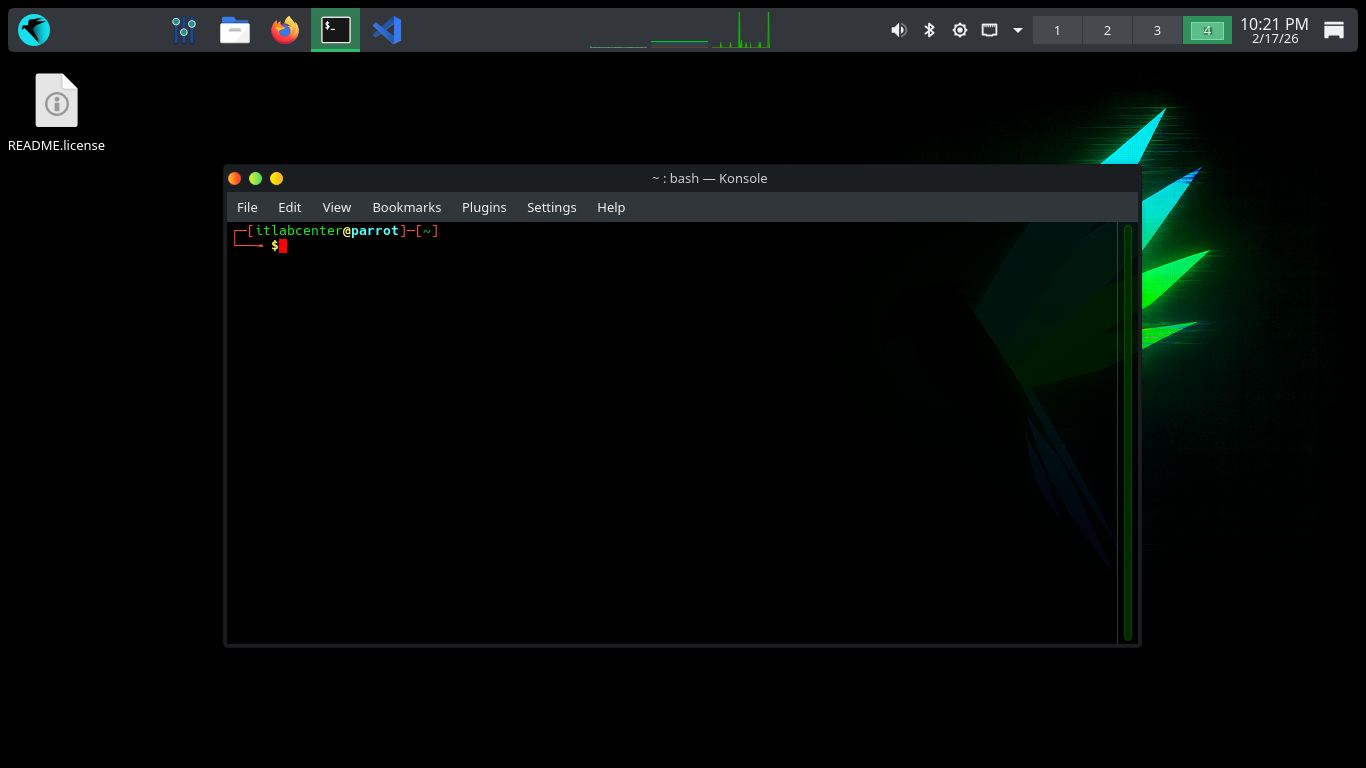
Run the following commands from the Parrot Security Terminal to update and upgrade the base system packages
[itlabcenter@parrot]-[~]
$sudo apt-get update && sudo apt-get full-upgrade -y
[itlabcenter@parrot]-[~]
$sudo reboot
Since native GVM packages often break on Parrot, Greenbone officially recommends using Community Containers
These will utilize Docker containers, similar to virtual machines, to isolate GVM from system libraries
Run the following commands from the Parrot Security Terminal to install and enable the Docker Services
[itlabcenter@parrot]-[~]
$sudo apt-get install docker.io docker-compose -y
[itlabcenter@parrot]-[~]
$sudo systemctl enable --now docker
[itlabcenter@parrot]-[~]
$sudo usermod -aG docker $USER
You must log out and log back in for the group change to take effect, if you areunsure just run a reboot
Run the following commands from the Parrot Security Terminal to create a directory and download our GVM
[itlabcenter@parrot]-[~]
$mkdir ~/greenbone-community && cd ~/greenbone-community
[itlabcenter@parrot]-[~/greenbone-community]
$curl -fLO https://greenbone.github.io/docs/latest/_static/docker-compose-22.4.yml
Run the following command from the Parrot Security Terminal to edit the GVM docker-compose config file
[itlabcenter@parrot]-[~/greenbone-community]
$nano docker-compose-22.4.yml
The Parrot Docker service known as podman does not have permission to use port 80 to listen for traffic
Find the following lines listed below and adjust it to match the below to configure the user of port 9392
ports:
- 127.0.0.1:9392:9392
Hit CTRL+O to save your changes and CTRL+X to exit the nano text editor. Now our service will start clean
Run the following commands from the Parrot Security Terminal to start the Greenbone Vulnerability Server
[itlabcenter@parrot]-[~/greenbone-community]
$systemctl --user enable --now podman.socket
[itlabcenter@parrot]-[~/greenbone-community]
$docker-compose -f docker-compose-22.4.yml up -d
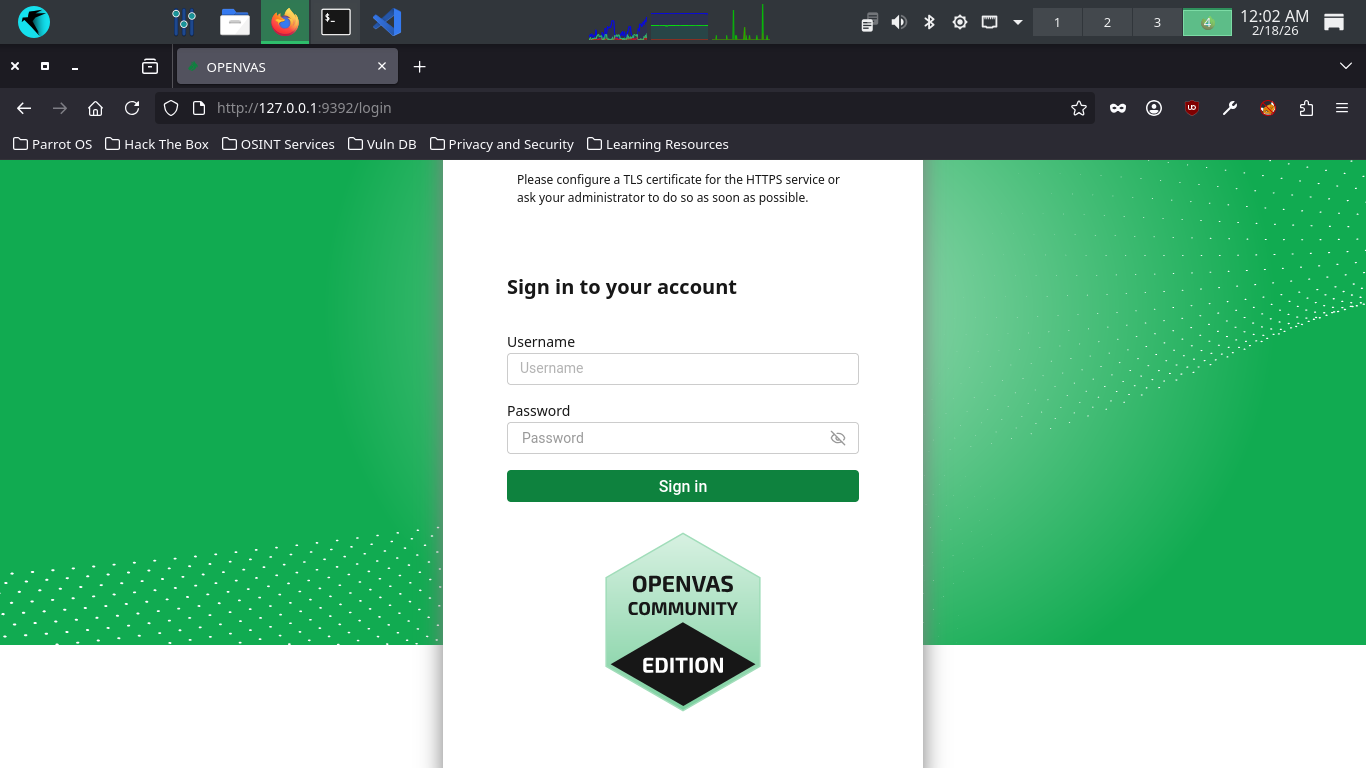
Open the Firefox Browser and head to http://127.0.0.1:9392. You will be redirected to the GVM web server
In this lab, we will use this web interface to perform and analyze OpenVAS vulnerability scans and reports
We will be using virtualbox to create virtual machines to perform our vulnerability scans against many OSs
Run the following commands from the Parrot Security Terminal to install the virtualbox program dependencies
[itlabcenter@parrot]-[~/greenbone-community]
$sudo apt-get install dkms build-essential linux-headers-$(uname -r)
[itlabcenter@parrot]-[~/greenbone-community]
$wget -q https://www.virtualbox.org/download/oracle_vbox_2016.asc -O- | sudo gpg --dearmor --yes -o /usr/share/keyrings/oracle-virtualbox-2016.gpg
[itlabcenter@parrot]-[~/greenbone-community]
$echo "deb [arch=amd64 signed-by=/usr/share/keyrings/oracle-virtualbox-2016.gpg] https://download.virtualbox.org/virtualbox/debian bookworm contrib" | sudo tee /etc/apt/sources.list.d/virtualbox.list
[itlabcenter@parrot]-[~/greenbone-community]
$wget http://ftp.debian.org/debian/pool/main/libv/libvpx/libvpx7_1.12.0-1+deb12u4_amd64.deb
[itlabcenter@parrot]-[~/greenbone-community]
$sudo apt install ./libvpx7_1.12.0-1+deb12u4_amd64.deb
Run the following commands from the Parrot Security Terminal to install the virtualbox hypervisor program
[itlabcenter@parrot]-[~/greenbone-community]
$sudo apt-get update
[itlabcenter@parrot]-[~/greenbone-community]
$sudo apt-get install virtualbox-7.1
Run the following command from the Parrot Security Terminal to start the virtualbox configuration script
[itlabcenter@parrot]-[~/greenbone-community]
$sudo /sbin/vboxconfig
Parrot Security OS includes the KVM Hypervisor by default, which will block virtualbox from running if on
Run the following command from the Parrot Security Terminal to create and set a blacklist file for the kvm
[itlabcenter@parrot]-[~/greenbone-community]
$sudo nano /etc/modprobe.d/blacklist-kvm.conf
Add the following lines to blacklist the Kernel Virtual Machine, use CTRL+O to save and CTRL+X to exit
blacklist kvm
blacklist kvm_intel
Run the following command from the Parrot Security OS to disable the libvirtd process and reboot the OS
[itlabcenter@parrot]-[~/greenbone-community]
$sudo systemctl stop libvirtd
[itlabcenter@parrot]-[~/greenbone-community]
$sudo systemctl disable libvirtd
[itlabcenter@parrot]-[~/greenbone-community]
$sudo reboot
After a reboot, our virtualbox hypervisor is ready for action, we will use this to create target systems
4. Run a Sample Vulnerability Scan
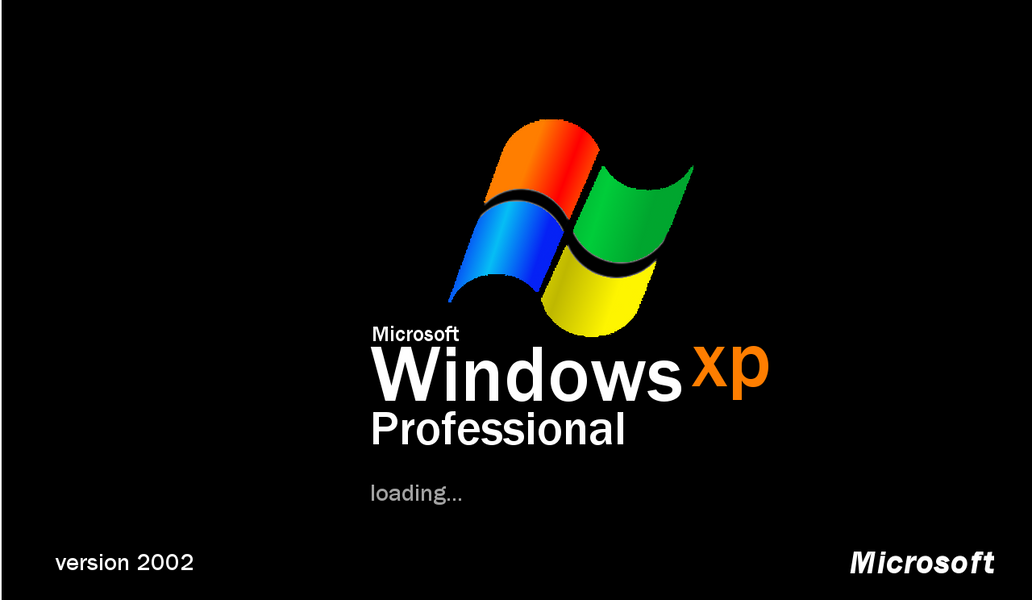
To get started with analyzing vulnerability reports, want want to run a scan which will generate many
vulnerabilities. We will accomplish this by scanning an outdate operating system, in this case Windows XP
Run the following command from the Parrot Security OS to start the virtualbox type 1 hypervisor program
[itlabcenter@parrot]-[~]
$virtualbox&
Resulting Output:
Run the following command from the Parrot Security Terminal to download a virtual image for Windows XP
[itlabcenter@parrot]-[~]
$wget -O winxp.iso "https://archive.org/download/winxpprosp3x86_202301/Windows%20XP%20Professional%20SP3%20x86.iso"
From Virtualbox, click new, then fill out the information below and select our iso file for Windows XP

Next click into the Unattended Install dropdown and create a password for the VM and enter the product key
MRX3F-47B9T-2487J-KWKMF-RPWBY
Click Finish to create our Virtual Machine, the system will automatically load up and begin the install

After the installation completes we will load into our desktop, ironically showing us a security warning
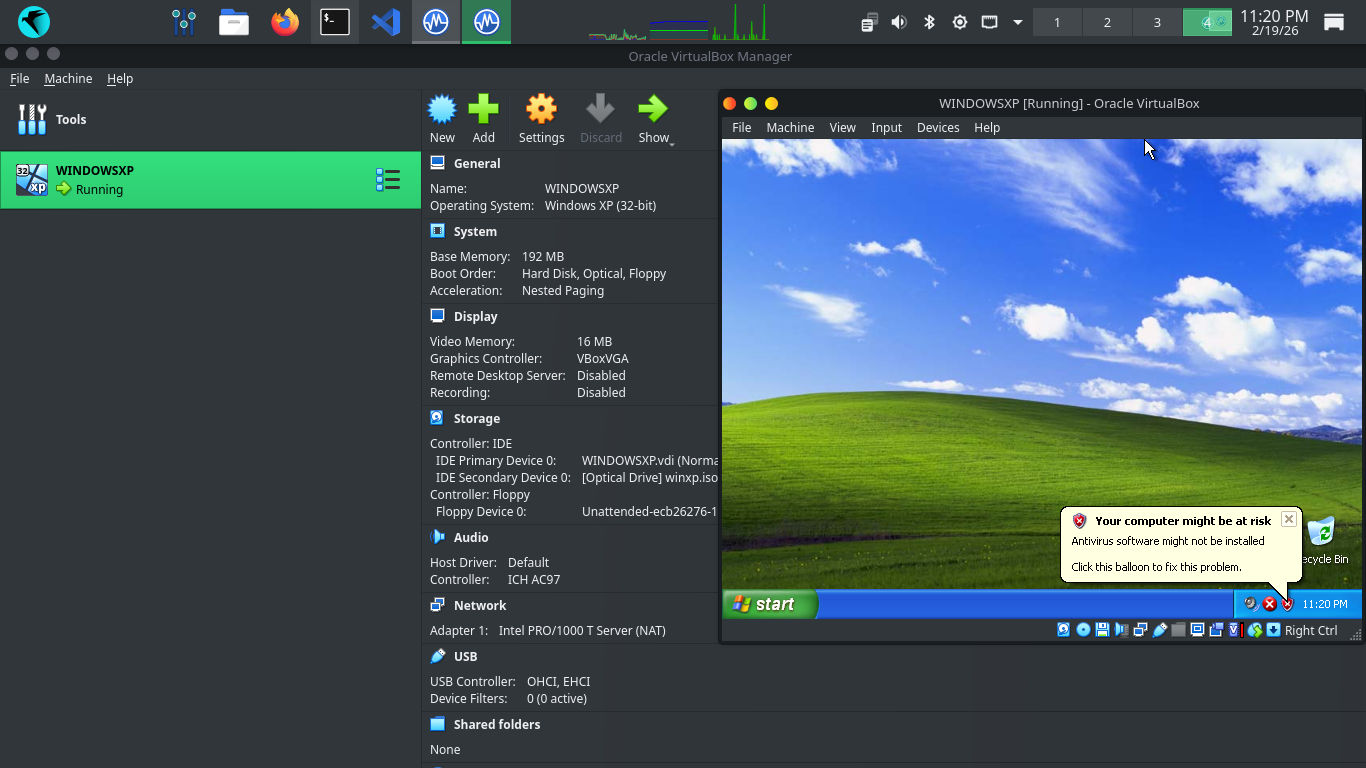
We will certainly test this. But first we need to configure the VM to talk to the host operating system
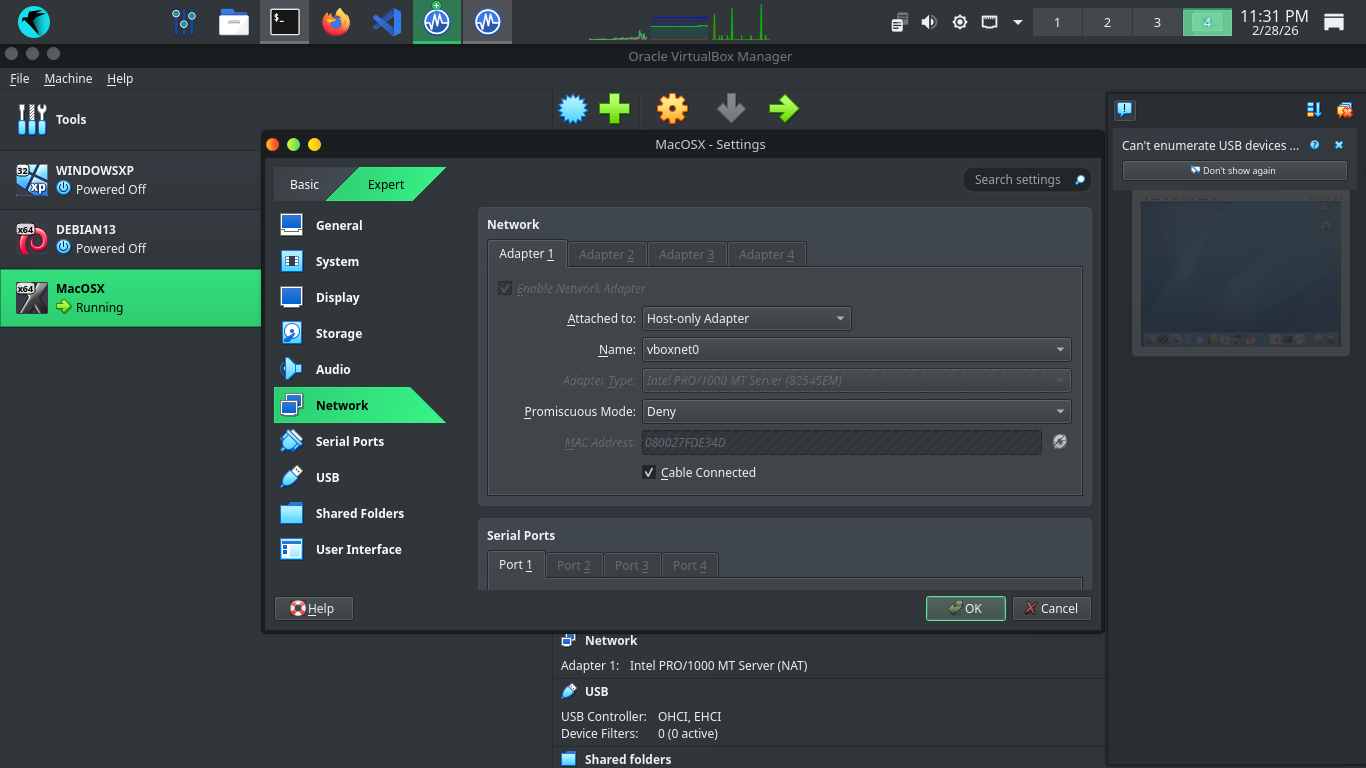
From virtualbox, click the three lines next to Tools and click Network, then click create for Host-Only
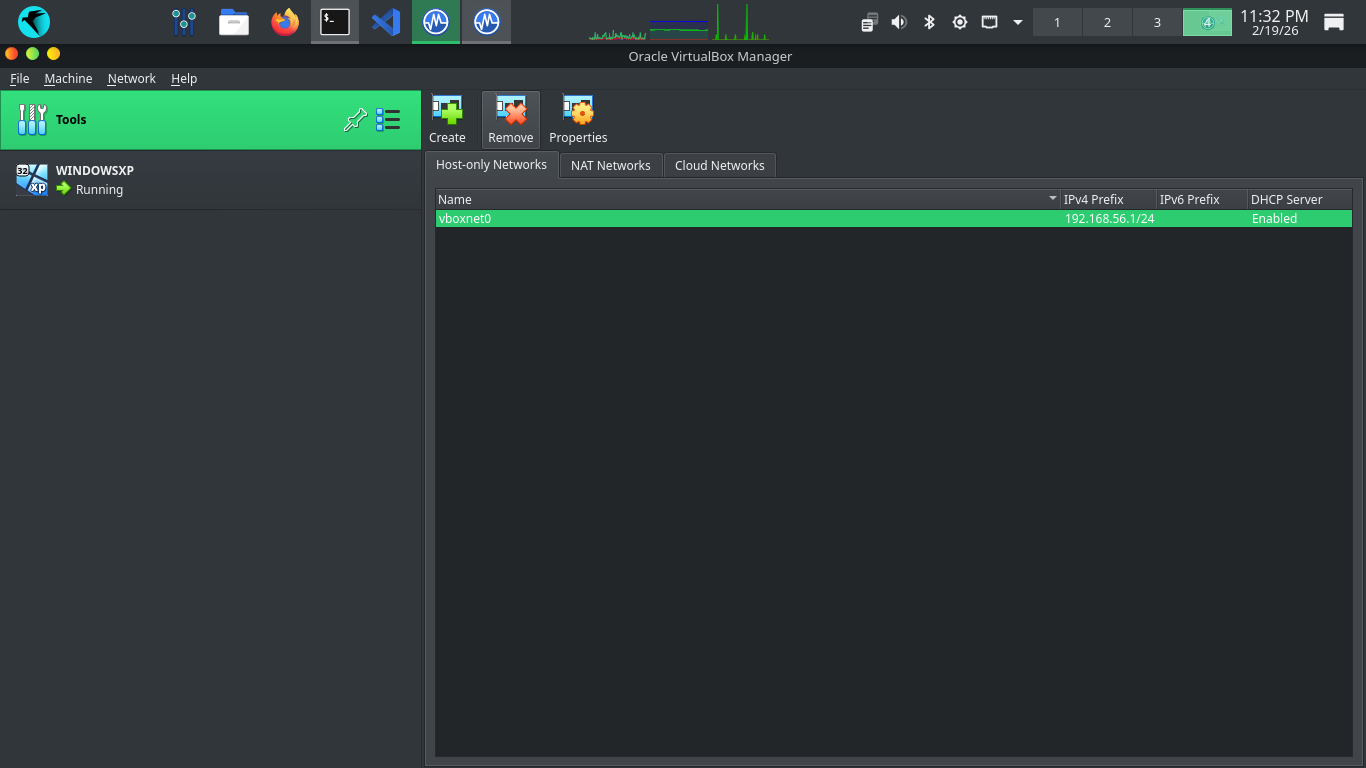
This creates the vboxnet0 network interface on our host machine, we will use this to talk to Windows XP
Click Windows XP at the left, then hit settings, head to network settings and attach to Host-Only Network
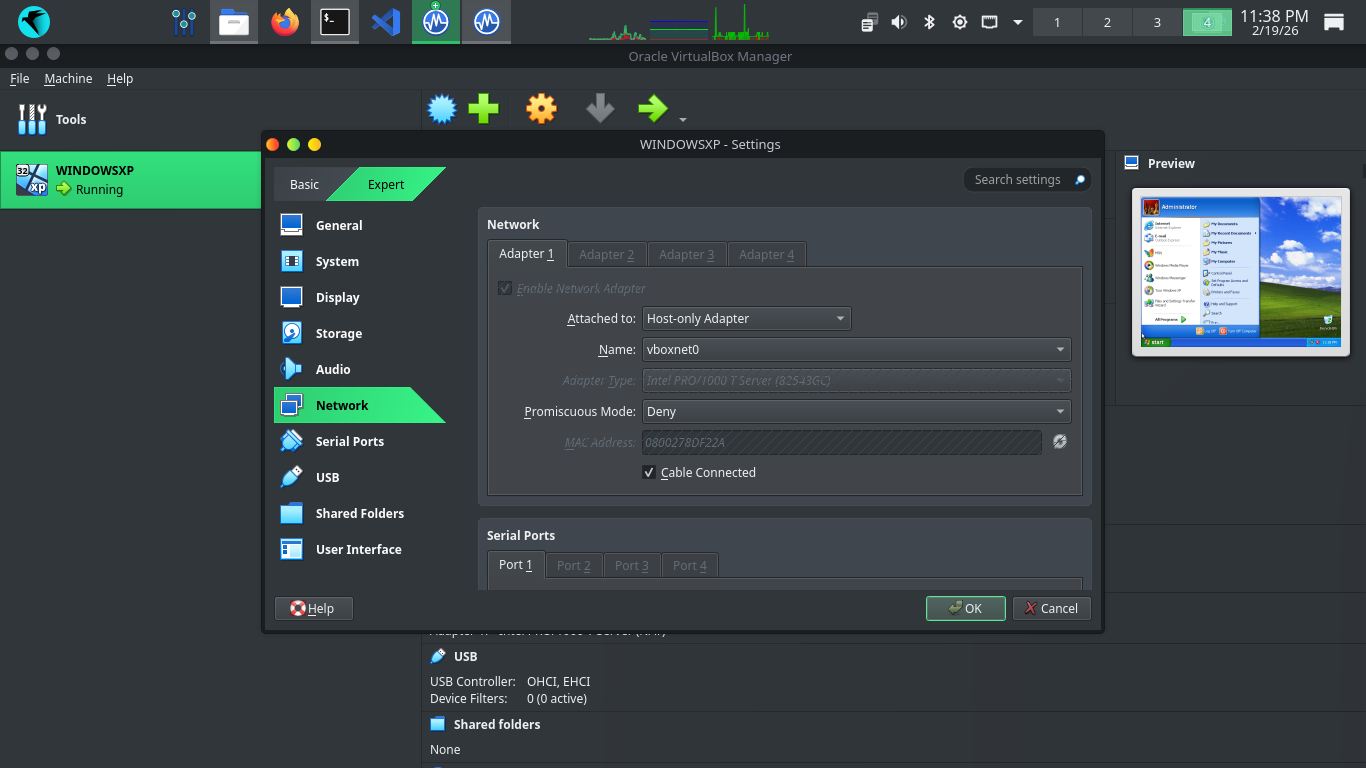
Click OK, then head back to our virtual machine and click start, then Run, and type in cmd and hit enter
This will pull up the command prompt. From here run ipconfig and hit enter to see our VMs given IP Address
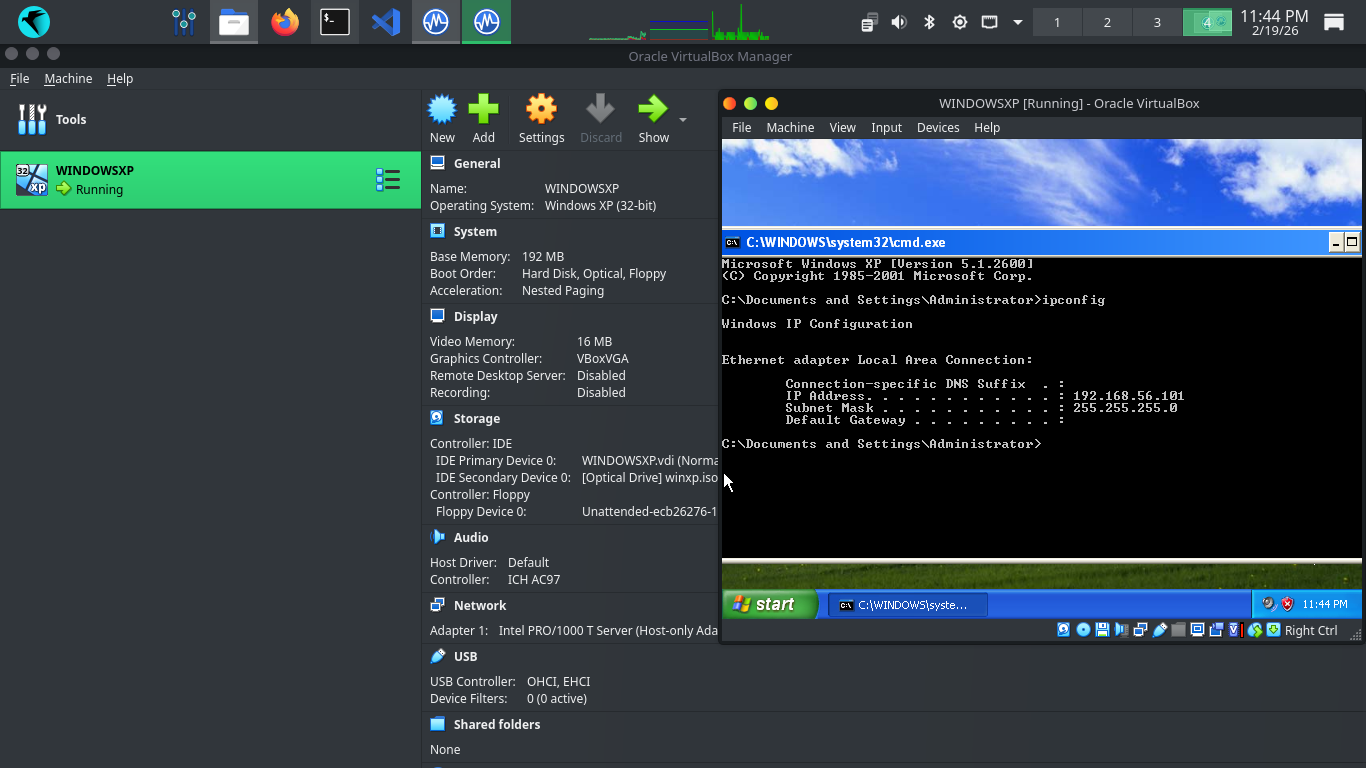
Windows XP includes a drop by default firewall for incoming traffic, this could interrupt our future scans
Head to Start, then open the run application and type cmd and hit enter, this will open the Windows XP CLI
Run the following command from the Windows XP Command Line to disable the Windows Firewall program entirely
C:\Documents and Settings\Administrator>netsh firewall set opmode disable
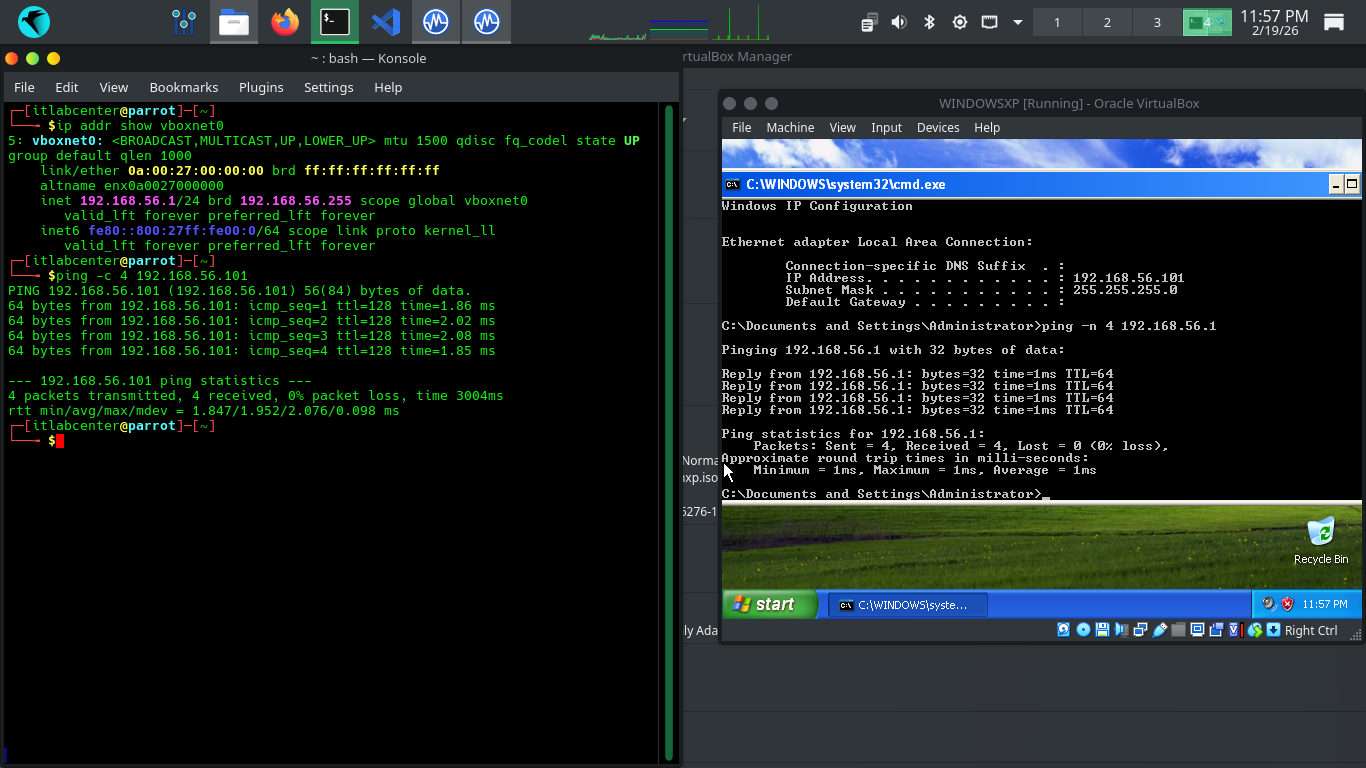
Run the following commands from the Parrot and Windows XP Terminals to ping each other to test connectivity
[itlabcenter@parrot]-[~]
$ping -c 4 192.168.56.101
C:\Documents and Settings\Administrator>ping -n 4 192.168.56.1
Resulting Output:
Now that network is established, run the following command from the Parrot Security Terminal to launch GVM
[itlabcenter@parrot]-[~]
$docker-compose -f greenbone-community/docker-compose-22.4.yml up -d
In order for us to run vulnerability scans, we need the gvmd process to fully sync, which can take time
Run the following command from the Parrot Security OS to view the Docker container ids for our GVM service
[itlabcenter@parrot]-[~]
$docker ps
Resulting Output:
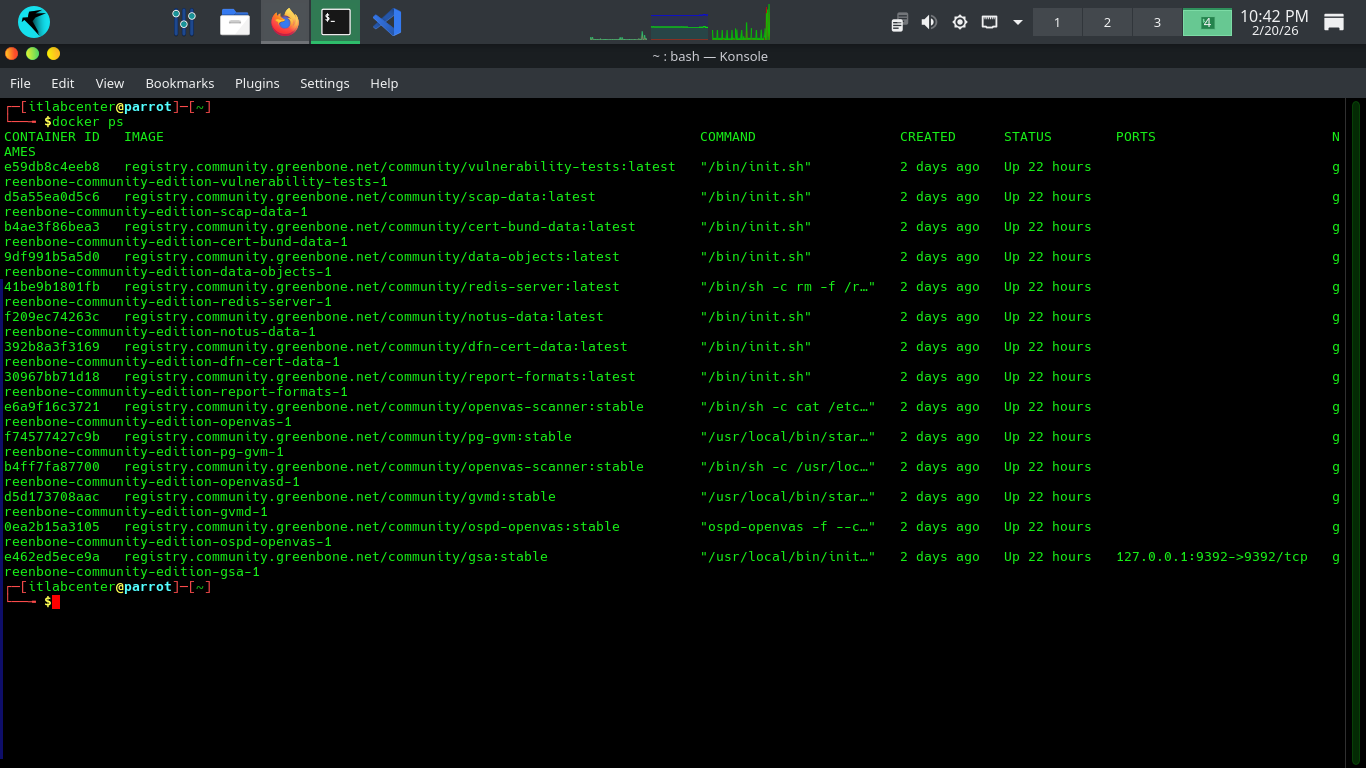
Look to for the container id for the gvdm:stable container, we will need to use it in the following command
[itlabcenter@parrot]-[~]
$docker logs -f d5d173708aac
This will show the progress of the CVE database sync, which may take considerable time, even several hours
The database needs to fully complete before we can run any scans. You will see Updating Discovery VVTs done
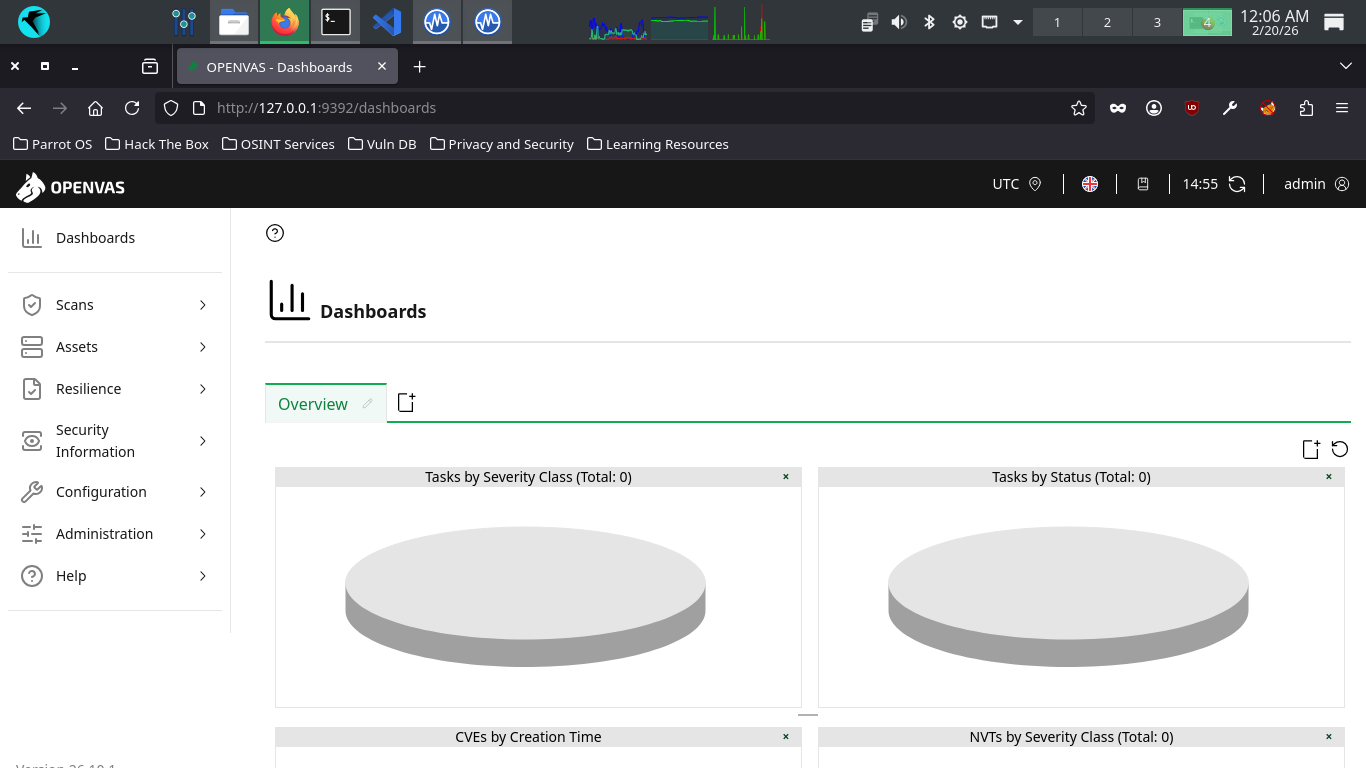
Head to 127.0.0.1:9392 in your firefox browser and login with the credentials admin, admin to view our GVM
On the left expand Scans, then head to Tasks. From here click the New Task Icon in the top left > New Task
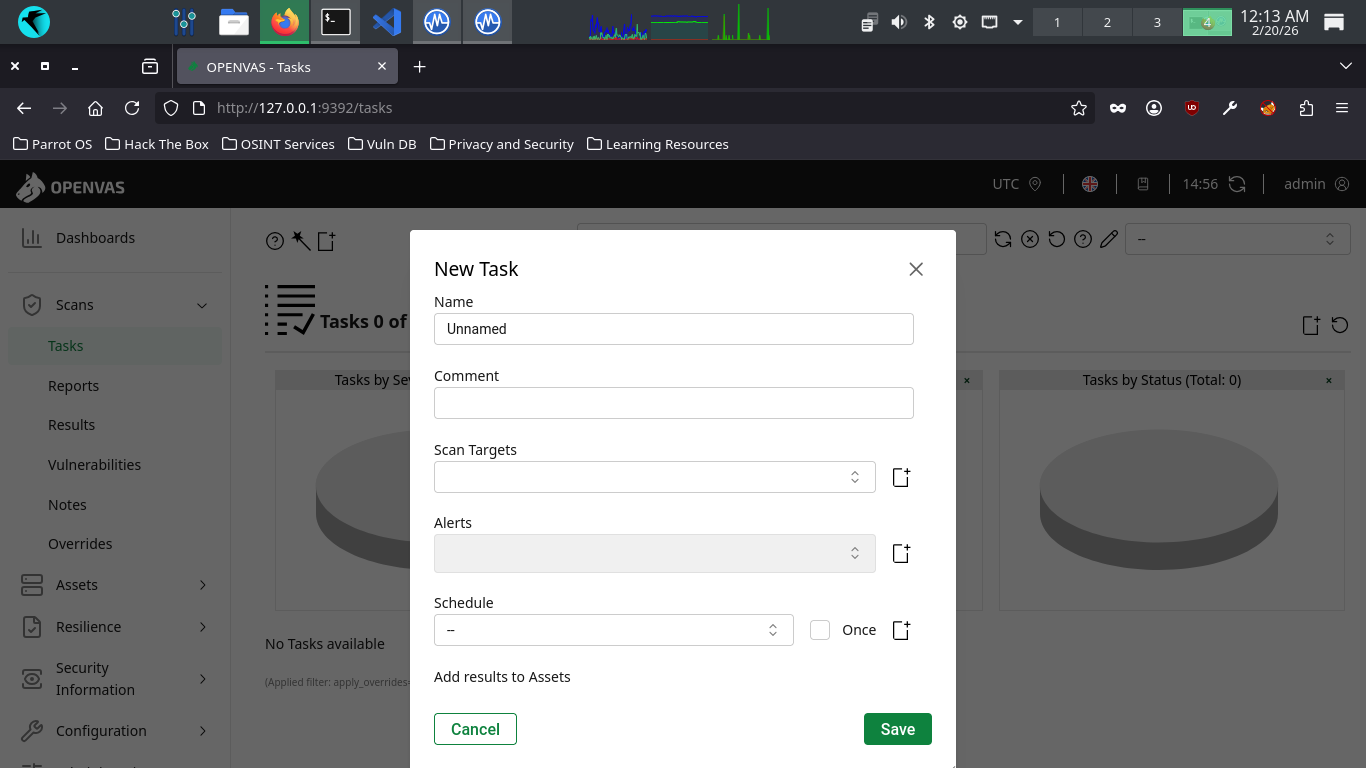
There are many configuration options available here. These are the important ones, use default for others
• Name: XPScan
• Scan Targets > Create a new target > Manual > 192.168.56.101
• Schedule: Once
• Scanner: OpenVAS Default
• Scan Config: Full and Fast
Now click save, afterwards you will see our newly created scanning task displayed at the right and bottom
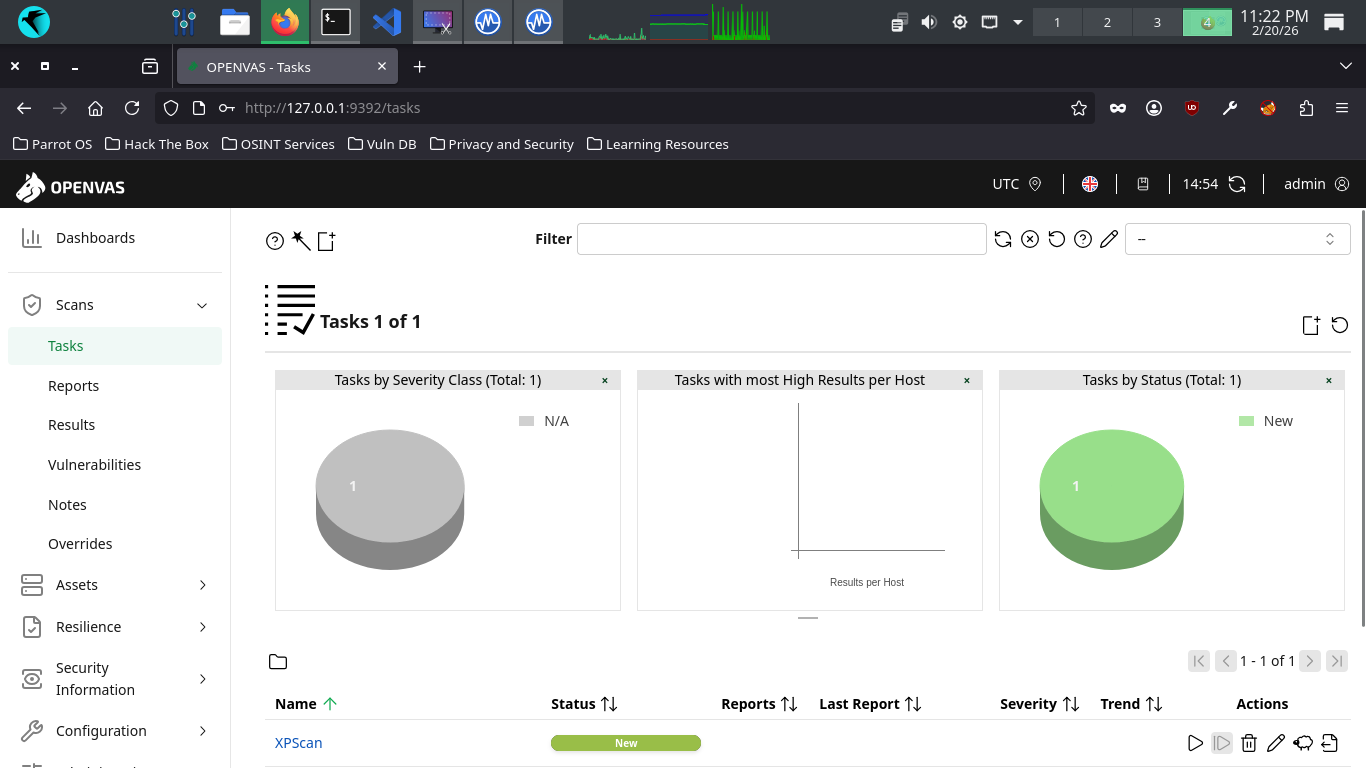
Hit the start button at the lower right to begin the OpenVAS Vulnerability scan, the dashboard will change
The scan will take approximately 20 minutes to fully complete. Once completed the scan will change to done
5. Analyze a Vulnerability Report
There are many types of vulnerabilities, including misconfigurations, backdoors, and insecure credentials
In this lesson, you will explore some of these common vulnerabilities and learn how to asses their impact
The best way to become familiar with vulnerability reports is by reading one for yourself, let's do that
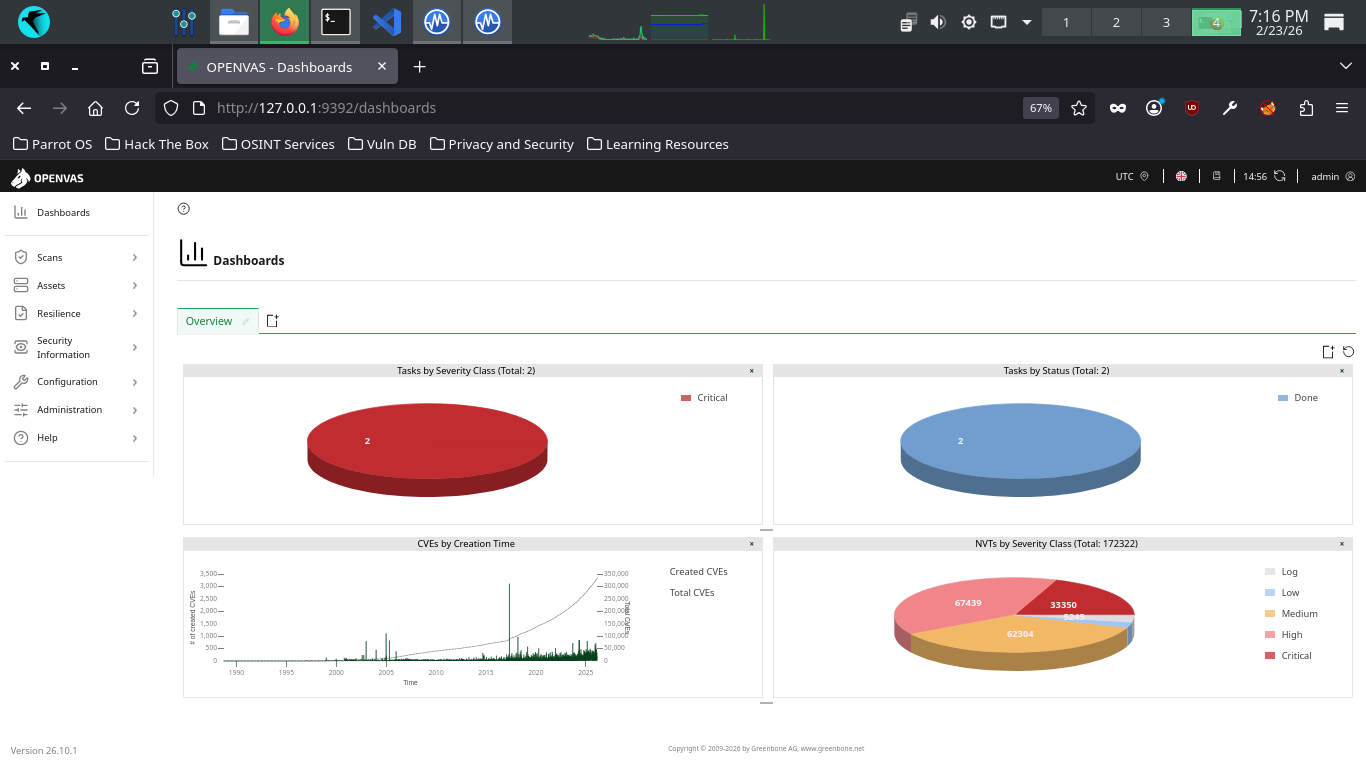
From the GreenBone Vulnerability Management web interface, hit the dashboard button from the upper-left
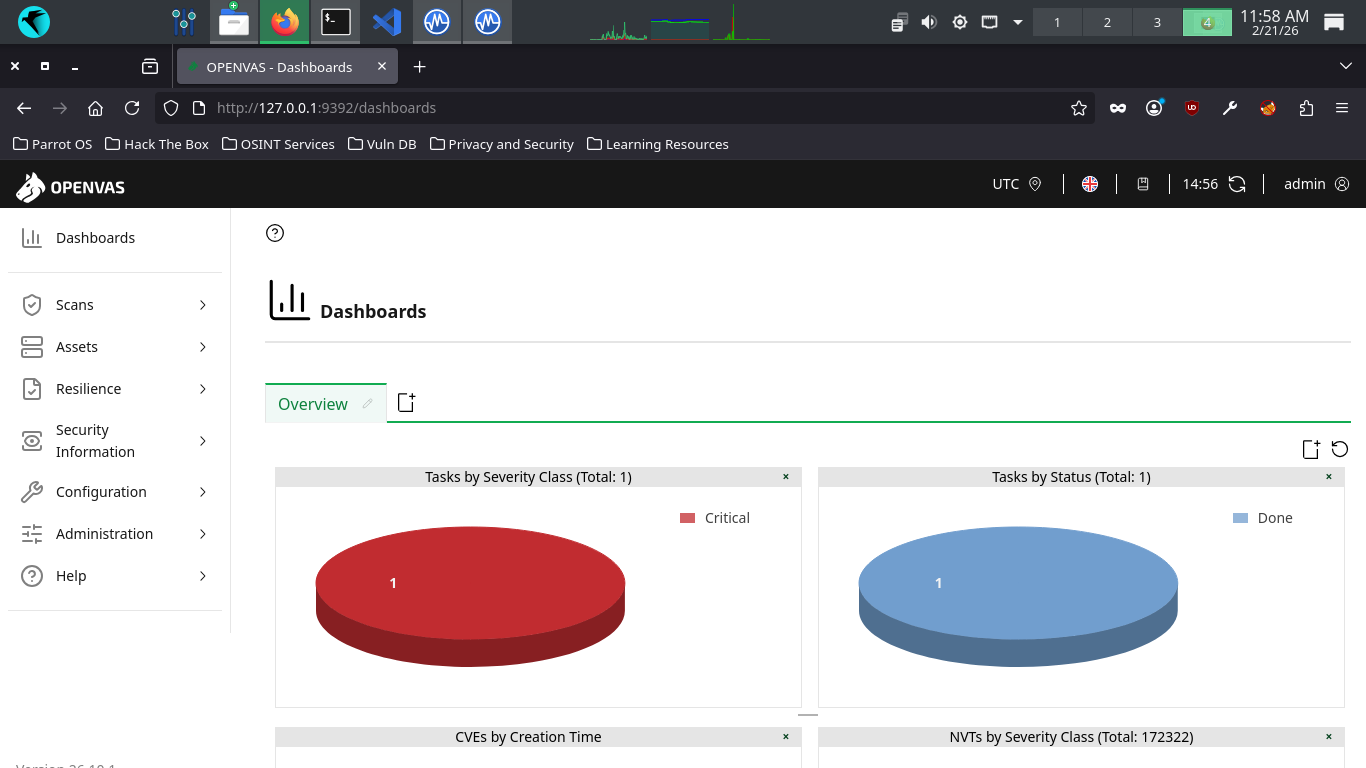
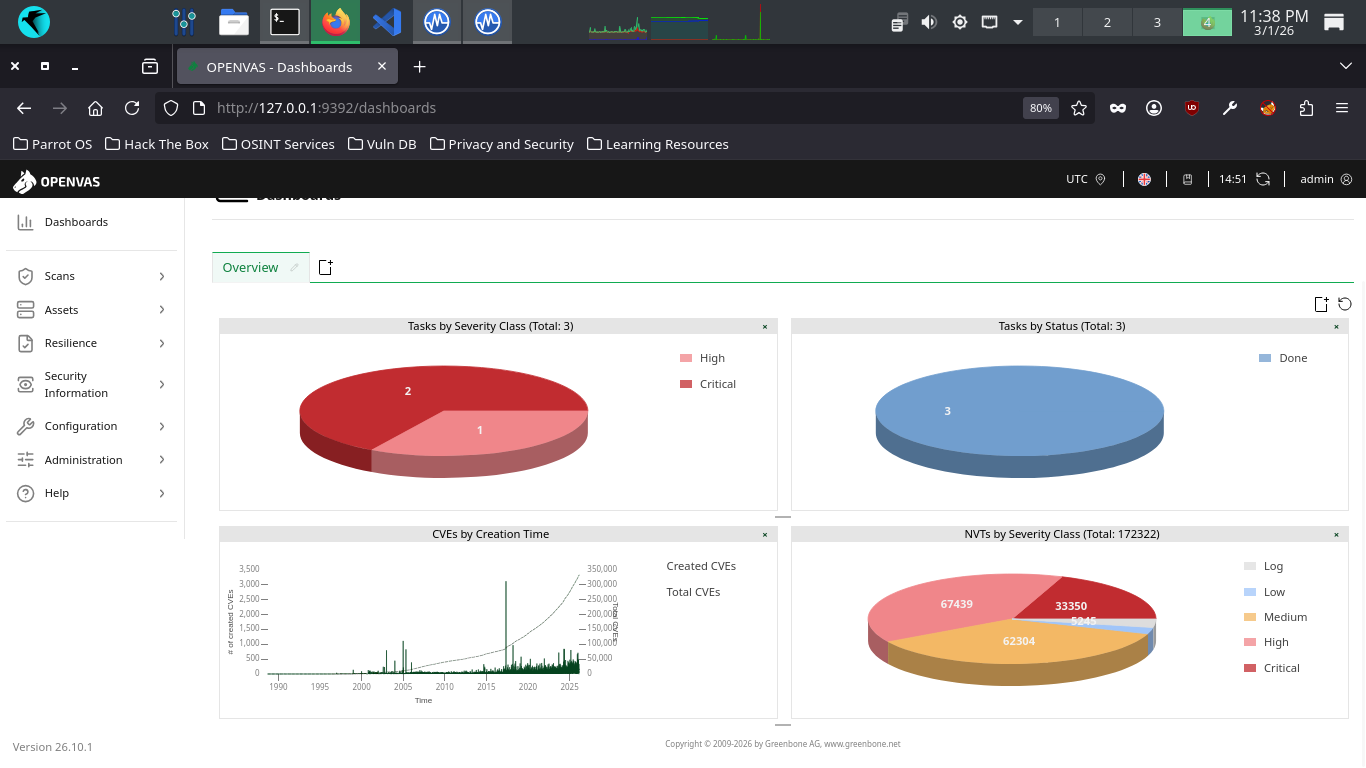
Welcome to the GSA dashboard. This view is customizable, but provides some useful information by default
Such as the number of vulnerabilities your scans have revealed and a view of CVEs discovered over time
CVEs (common Vulnerabilities and Exposures) are publicly disclosed vulnerabilities in computer systems
When a new software/hardware vulnerability is discovered, it is assigned a CVE identifier and severity
After which the CVE is then added to a public repository called the NVD (National Vulnerability Database)
The NVD and its catalogue of CVEs provides security professionals with common language for reffering to
unique vulnerabilities and facilitates the exchange of information surrounding all these vulnerabilities
Not all vulnerabilities will correspond to a CVE, and that should make sense, since something like default
credentials vulnerabilities aren't software specific. The scanner will offer its own severity for these

Severity is often calculated using a scoring system called the CVSS (Common Vulnerability Scoring System)
OpenVAS has a built-in CVSS interface that you can utilize to generate a score based on several criteria
Common criteria to use for this includes the attack methos and complexity, and level of user interaction
This is particularly useful for quantifying the severity of vulnerabilities discovered in a manual audit
such as a Penetration Test. From the top navigation menu, expand the scans dropdown and navigate to tasks
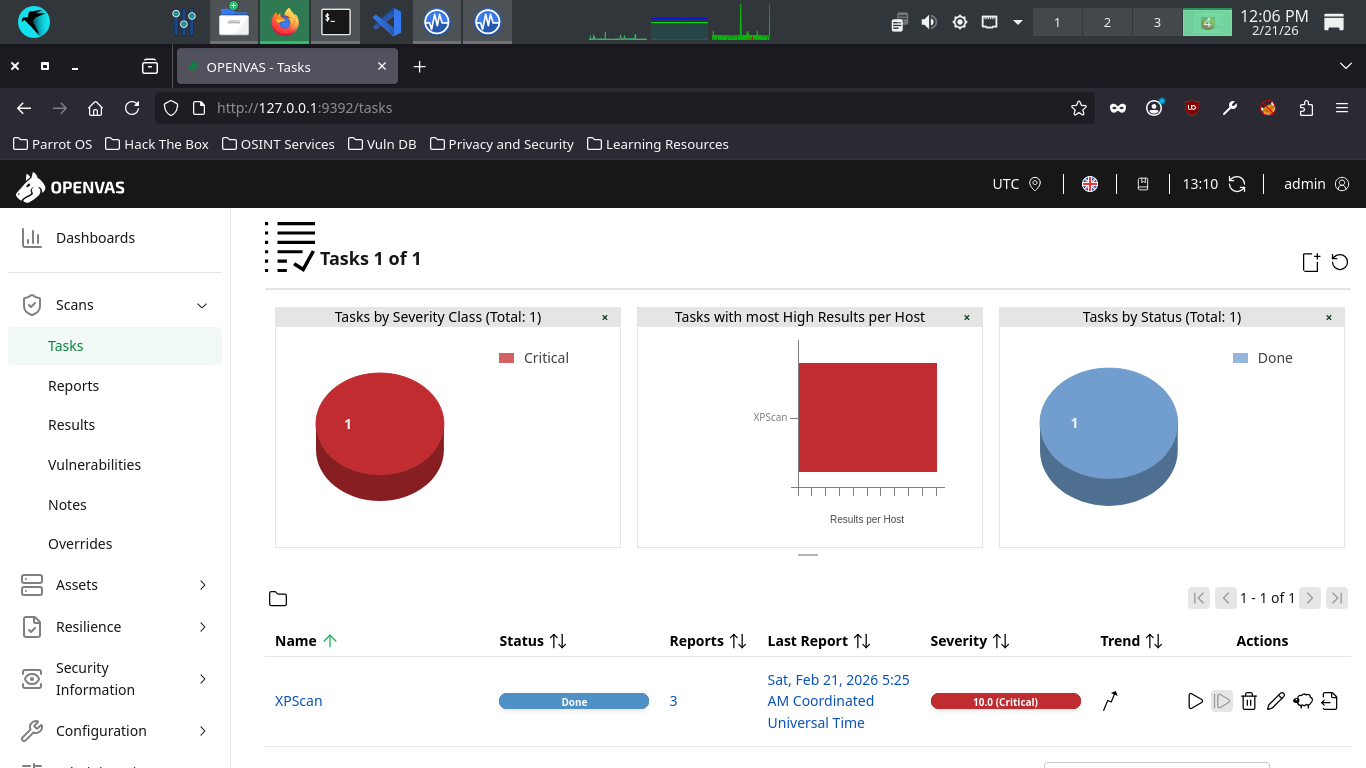
Click the dated report link, then click the results tab to view the vulnerabilities discovered by OpenVAS
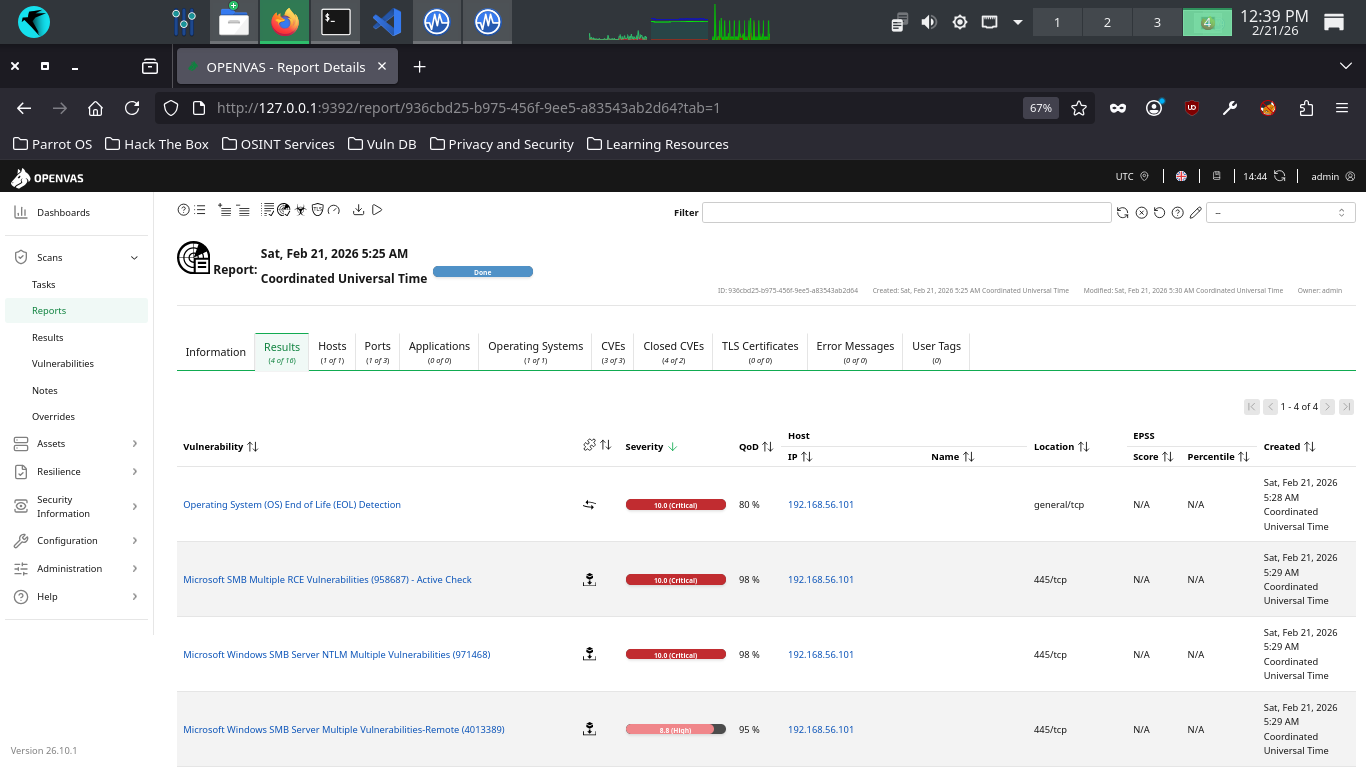
In addition to the vulnerability name, the solution type is indicated (puzzle piece) along with severity
The QoD or Quality of Detection is also listed along with the IP, hostname, the port and protocols used
This report contains a few unfortunate discoveries. First, you'll note the operating is EOL (End of Life)
This means that the operating system and software is no longer receiving security updates from Microsoft
Without ongoing security updates the system will continue to hold unpatched publicly known vulnerabilities
Beyond the operating system, your haul contains some other good examples of critical vulnerability types
A vulnerability in the Server Message Block (SMB) Protocol Software due to how it handles the SMB packets
This vulnerability allows RCE, or Remote Code Execution, that allows an attacker to execute code on the PC
RCE vulnerabilities are generally always classified as critical, since this allows a worst case scenario
Among the most depressing and avoidable vulnerabilities that exists in our Windows XP scanning report
This is a vulnerability in the SMB Server software due to how it handles authentication of user accounts
A lack of cryptography when the SMB server generates challenges can be exploited to bypass authentication
The lack of input validation when processing SMB requests can also be exploited to cause a buffer overflow
The lack of input validation when parsing SMB packets can also be exploited to cause memory corruption
A NULL pointer deference error exists when verifying SMB fields which could cause a Denial of Service
Multiple Flaws exist due to the way that the Server Message Block 1.0 server handles certain requests
This vulnerability allows RCE, or Remote Code Execution, that allows an attacker to execute code on the PC
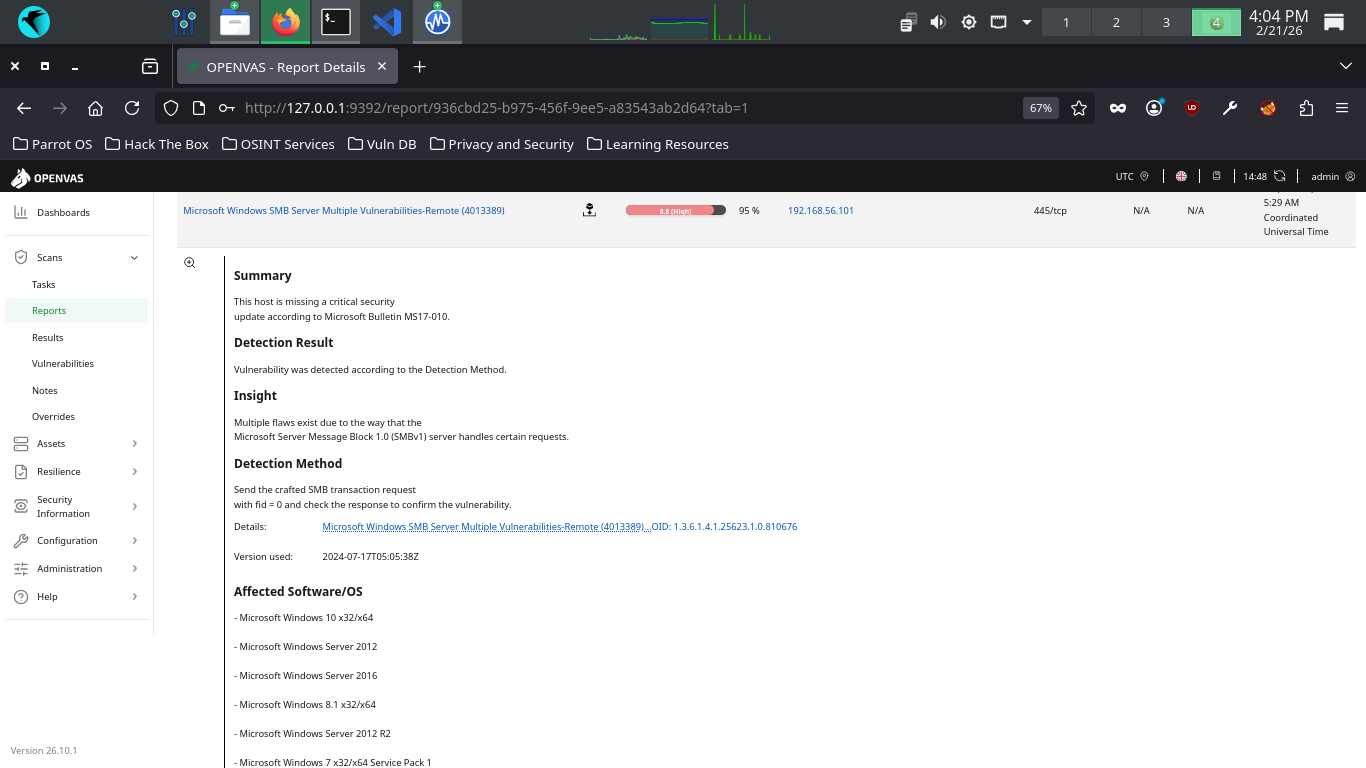
You can view more details about each vulnerability by clicking on its name in the Greenbone Web Interface
We can see that Windows XP is not a secure operating system in 2026. Close your Windows XP virtual machine
6. Recreate Vulnerabilities w/ Debian
We have more vulnerabilities to call out that we will need to recreate in order to generate reports for
For this we will switch to Debian Linux and purposefully misconfigure our environment to be vulnerable
Run the following command from the Parrot Security Terminal to download a virtual image for Debian Linux
[itlabcenter@parrot]-[~]
$wget -O debian.iso https://cdimage.debian.org/debian-cd/current/amd64/iso-cd/debian-13.3.0-amd64-netinst.iso
If the link 404s its because debian has updated their release, check for a new version at Debian Netinst
From Virtualbox, click new, then fill out the information below and select our iso file for Debian Linux
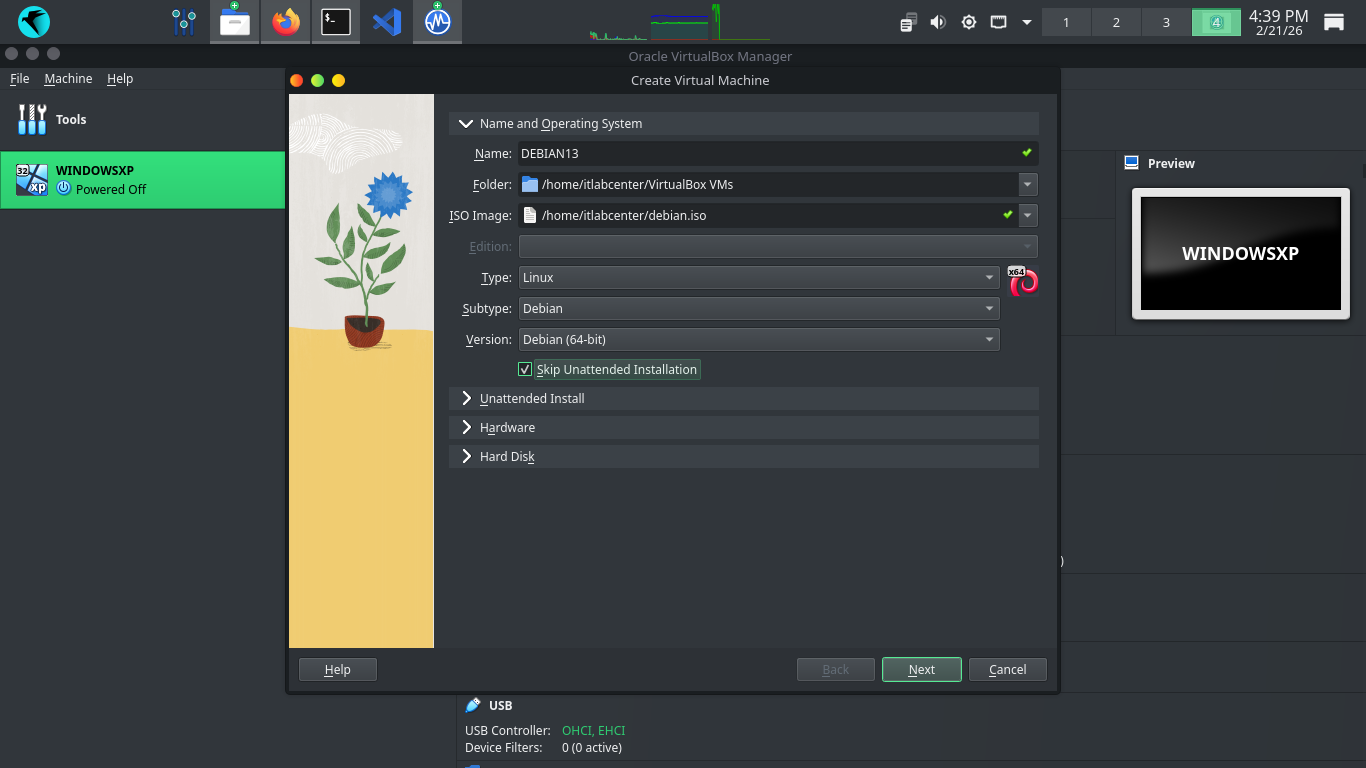
Next click into the Unattended Install dropdown and create a password for the VM without a product key
Click Finish to create our Virtual Machine, the system will automatically load up and begin the install
After the installation completes we will load into our bootloader, press enter to be taken to the desktop
Hit the three dots at the lower right and select the terminal application. We will work mostly from here
Run the following commands from the Virtualbox Debian Terminal to add the vboxuser account to sudo group
vboxuser@vbox:~$ su
root@vbox:/home/vboxuser# sudo usermod -aG sudo vboxuser
root@vbox:/home/vboxuser# sudo reboot
Run the following commands from the Virtualbox Debian Terminal to install an unpatched version of apache
vboxuser@vbox:~$ sudo apt-get update
vboxuser@vbox:~$ sudo apt-get install default-jdk wget -y
vboxuser@vbox:~$ wget https://archive.apache.org/dist/tomcat/tomcat-9/v9.0.30/bin/apache-tomcat-9.0.30.tar.gz
vboxuser@vbox:~$ tar -xvf apache-tomcat-9.0.30.tar.gz
vboxuser@vbox:~$ sudo mv apache-tomcat-9.0.30 /opt/tomcat
vboxuser@vbox:~$ sudo chmod +x /opt/tomcat/bin/*.sh
vboxuser@vbox:~$ sudo nano /etc/systemd/system/tomcat.service
Type out the systemd service file below, then use CTRL+O when finished to save and CTRL+X to exit nano
[Unit]
Description=Tomcat Ghostcat
After=network.target
[Service]
Type=forking
User=root
Group=root
Environment=CATALINA_PID=/opt/tomcat/temp/tomcat.pid
Environment=CATALINA_HOME=/opt/tomcat
ExecStart=/opt/tomcat/bin/startup.sh
ExecStop=/opt/tomcat/bin/shutdown.sh
[Install]
WantedBy=multi-user.target
Run the following command from the Virtualbox Debian Terminal to enable and start the Apache Tomcat server
vboxuser@vbox:~$ sudo systemctl daemon-reload && sudo systemctl enable --now tomcat
Run the following commands from the Virtualbox Debian Terminal to recreate NetMan 204 default credentials
vboxuser@vbox:~$ sudo apt-get install openssh-server && sudo systemctl enable --now ssh
vboxuser@vbox:~$ sudo useradd -m -s /bin/bash admin && echo "admin:admin" | sudo chpasswd
vboxuser@vbox:~$ sudo useradd -m -s /bin/bash eurek && echo "eurek:eurek" | sudo chpasswd
vboxuser@vbox:~$ sudo sed -i 's/#PasswordAuthentication yes/PasswordAuthentication yes/' /etc/ssh/sshd_config
vboxuser@vbox:~$ echo "NetMan 204 v4.05" | sudo tee /etc/ssh/sshd-banner
vboxuser@vbox:~$ echo "Banner /etc/ssh/sshd-banner" | sudo tee -a /etc/ssh/sshd_config
vboxuser@vbox:~$ sudo mkdir -p /opt/tomcat/webapps/ROOT/cgi-bin/
vboxuser@vbox:~$ echo "Netman 204" | sudo tee /opt/tomcat/webapps/ROOT/cgi-bin/view_about.cgi
vboxuser@vbox:~$ sudo echo "" > /opt/tomcat/webapps/ROOT/index.jsp
vboxuser@vbox:~$ sudo nano /opt/tomcat/webapps/ROOT/index.jsp
NetMan 204 is a UPS system, in order for our OpenVAS to detect it, we must trick it with a banner page
Type out the NetMan 204 banner page below, then use CTRL+O when finsihed to save and CTRL+X to exit nano
<html>
<head><title>Netman 204</title></head>
<body>
<h1>Riello UPS Netman 204</h1>
<p>Software Version 4.05</p>
<p>Network Agent Status: Online</p>
</body>
</html>
Run the following commands from the Virtualbox Debian Terminal to install an unpatched version of VSFTPD
vboxuser@vbox:~$ sudo apt-get install build-essential libssl-dev libcap-dev git libpam0g-dev -y
vboxuser@vbox:~$ sudo useradd -m nobody 2>/dev/null && sudo mkdir -p /usr/share/empty
vboxuser@vbox:~$ sudo mkdir -p /var/ftp && sudo useradd -d /var/ftp -s /usr/sbin/nologin ftp 2>/dev/null
vboxuser@vbox:~$ sudo chown root:root /var/ftp && sudo chmod 555 /var/ftp
vboxuser@vbox:~$ git clone https://github.com/DoctorKisow/vsftpd-2.3.4
vboxuser@vbox:~$ cd vsftpd-2.3.4
vboxuser@vbox:~/vsftpd-2.3.4$ nano str.c
Unfortunately, this old version of VSFTPD will not compile cleanly on a modern Debian without some patches
Add the following lines below after the #include lines and use CTRL+O to save and use CTRL+X to exit nano
/* Make Compilation Patches */
void vsf_sysutil_extra(void);
Run the following command from the Virtualbox Debian Terminal to edit the Makefile for compilation config
vboxuser@vbox:~/vsftpd-2.3.4$ nano Makefile
Edit the following line for the LIBS tag to match below and use CTRL+O to save and CTRL+X to exit nano
LIBS = -lpam -lcap -lcrypt
Run the following command from the Virtualbox Debian Terminal to compile the unpatched version of VSFTPD
vboxuser@vbox:~/vsftpd-2.3.4$ make
Run the following command from the Virtualbox Debian Terminal to create and edit the VSFTPD config file
vboxuser@vbox:~/vsftpd-2.3.4$ sudo nano /etc/vsftpd.conf
Type out the following VSFTPD config file below and use CTRL+O to save when finished and CTRL+X to exit
listen=YES
anonymous_enable=YES
local_enable=YES
write_enable=YES
anon_root=/var/ftp
ftpd_banner=vsFTPd 2.3.4
ssl_enable=NO
no_anon_password=YES
Run the following command from the Virtualbox Debian Terminal to create and edit a service file for VSFTPD
vboxuser@vbox:~/vsftpd-2.3.4$ sudo nano /etc/systemd/system/vsftpd.service
Type out the systemd service file below, then use CTRL+O when finished to save and CTRL+X to exit nano
[Unit]
Description=vsftpd 2.3.4
After=network.target
[Service]
ExecStart=/home/user/vsftpd-2.3.4/vsftpd /etc/vsftpd.conf
Restart=always
User=root
[Install]
WantedBy=multi-user.target
Run the following command from the Virtualbox Debian Terminal to enable and start the VSFTPD FTP server
vboxuser@vbox:~/vsftpd-2.3.4$ sudo systemctl daemon-reload && sudo systemctl enable --now vsftpd && cd ..
We will certainly test these. But first we need to configure the VM to talk to the host operating system
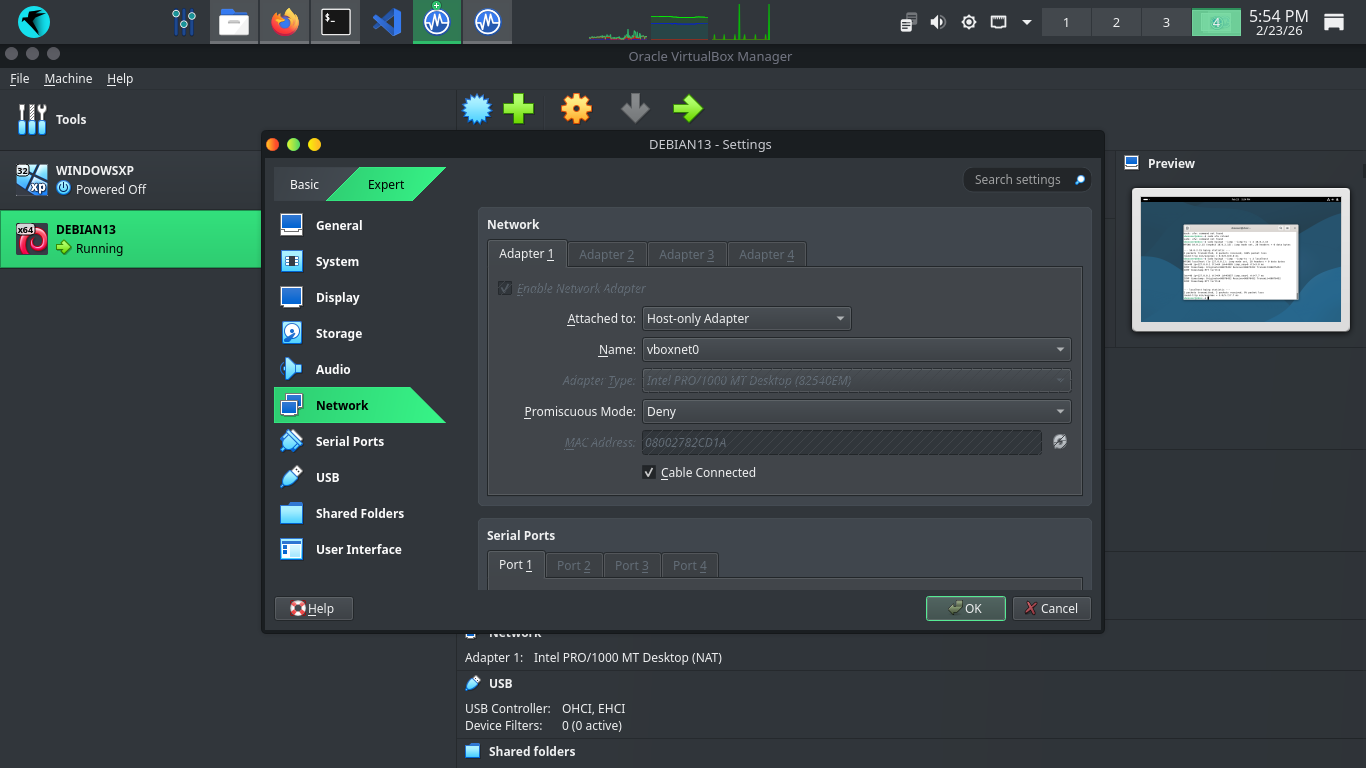
From Virtualbox click Debian on the left, then settings > network settings and attach to Host-Only Network
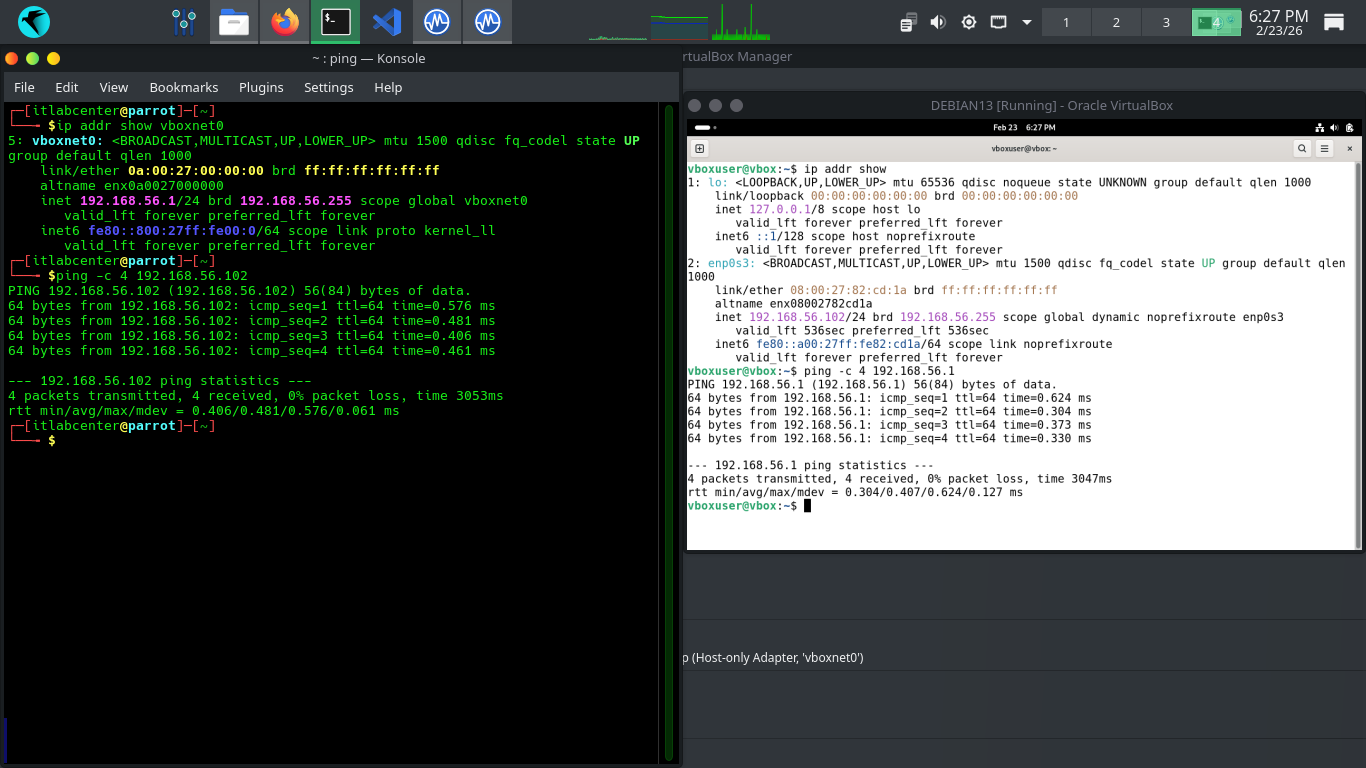
Before running our scans we need to verify connectivity, run ip addr show from Debian to show IP Address
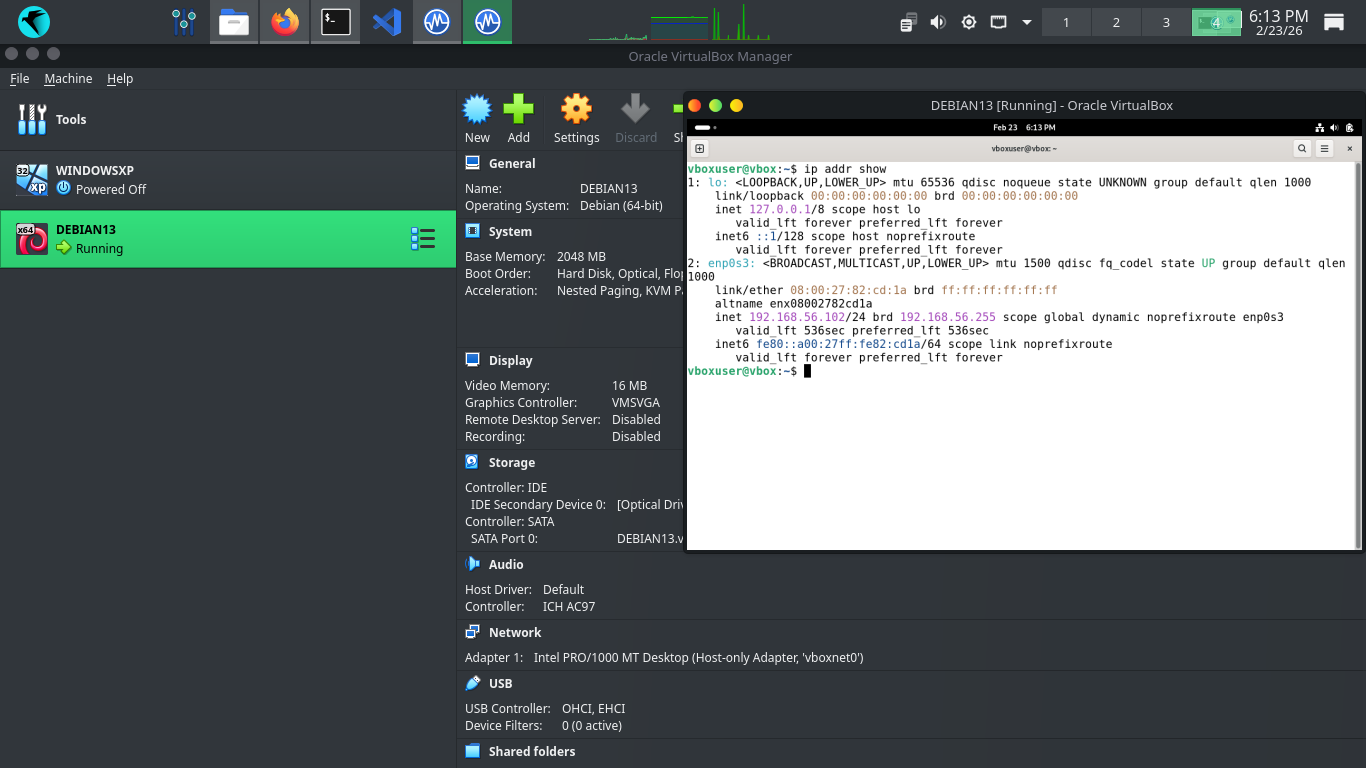
Run the following commands from the Parrot and Debian Terminals to ping each other to test connectivity
[itlabcenter@parrot]-[~]
$ping -c 4 192.168.56.102
vboxuser@vbox:~$ ping -c 4 192.168.56.1
Resulting Output:
Head to 127.0.0.1:9392 in your firefox browser and login with the credentials admin, admin to view our GVM
On the left expand Scans, then head to Tasks. From here click the New Task Icon in the top left > New Task
We are going to run another scan against this host, here are the configurations, leave others as default
• Name: DebianScan
• Scan Targets > Create a new target > Manual > 192.168.56.102
• Scan Targets > Create a new Target > Consider Hosts as Alive
• Schedule: Once
• Scanner: OpenVAS Default
• Scan Config: Full & Fast
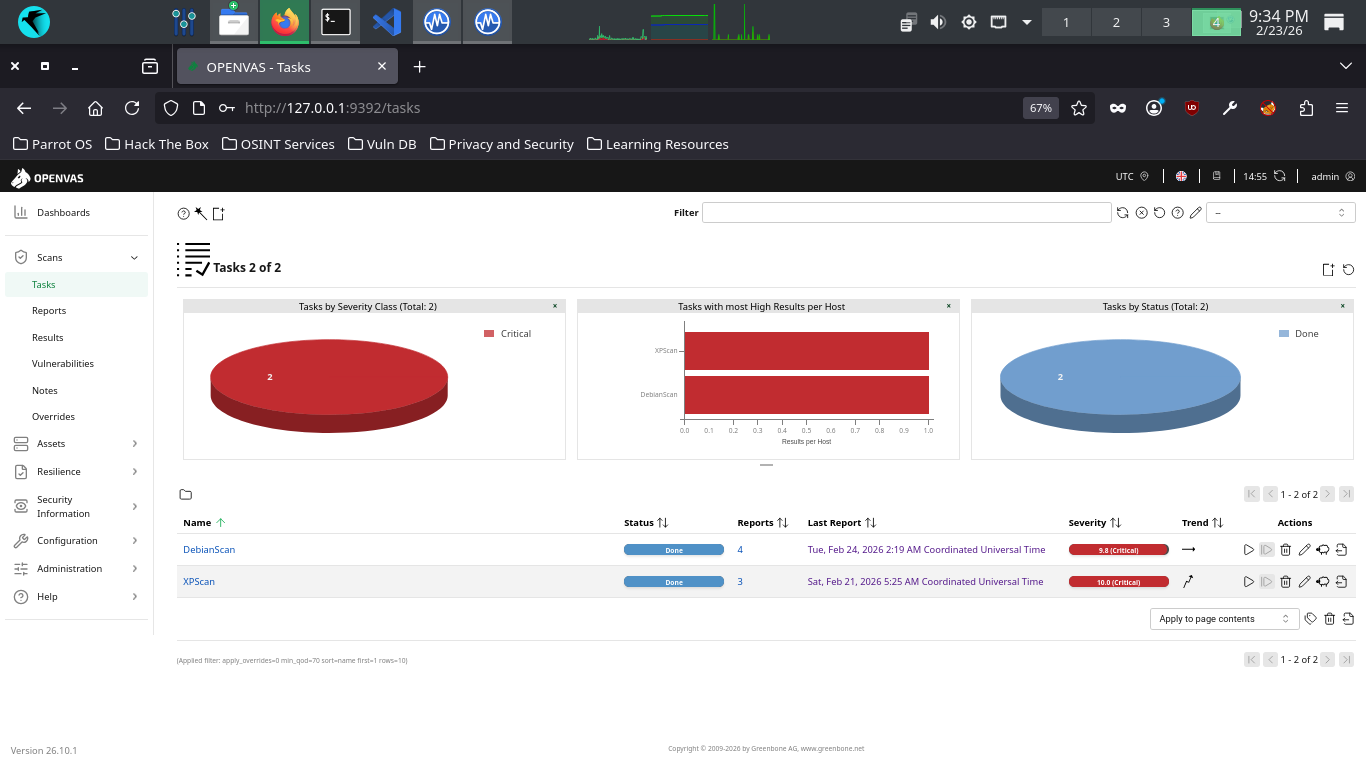
Now click save, afterwards you will see our newly created scanning task displayed at the right and bottom
Hit the start button at the lower right to begin the OpenVAS Vulnerability scan, the dashboard will change
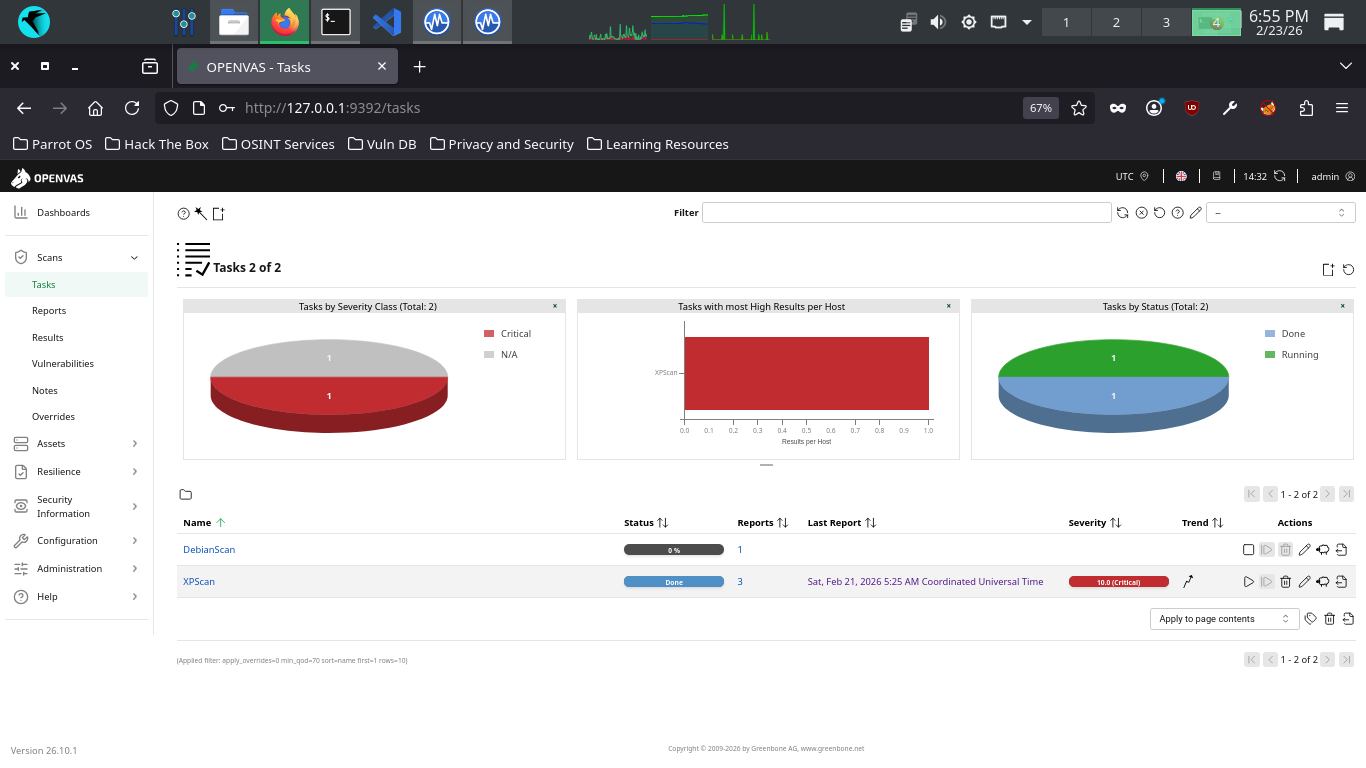
The scan will take approximately 20 minutes to fully complete. Once completed the scan will change to done
7. Analyze Another Vulnerability Report
Here we will review the vulnerabilities we have recreated and discuss their raw impact and exploitability
From the GreenBone Vulnerability Management web interface, hit the dashboard button from the upper-left
From the Greenbone Web GUI, at the top navigation menu, expand the scans dropdown and navigate to tasks
Click the dated report link, then click the results tab to view the vulnerabilities discovered by OpenVAS
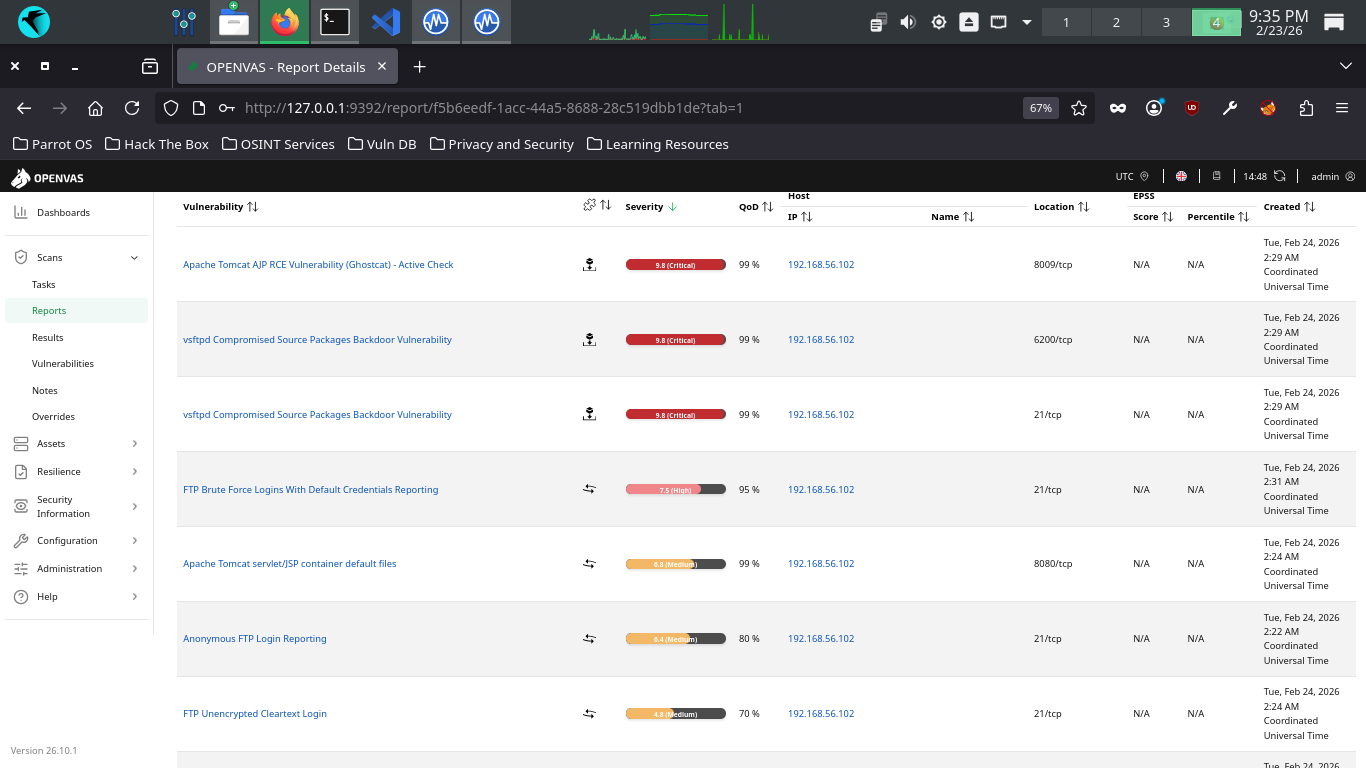
Your haul contains many great examples of critical vulnerability types we had not seen in the Windows scan
A vulnerability in Apache Tomcat, a web application server, allowing attackers to read files on the server
This vulnerability allow RCE, or Remote-Code Execution, that allows an attacker to execute code on a host
RCE vulnerabilities are generally always classified as critical, since this allows a worst case scenario
Backdoor access stored in the official source packages of a popular file transfer software supply chain
If you updated your software like a responsible digital citizen you'll inadvertently add an attack vector
Remember how we said updating your system is crucial? Attackers know this too and will compromise repos
File transfer services generally run on port 21, but you can see this service is also available on 6200
It was possible for OpenVAS to login to our VSFTPD service with the following credentials: admin, admin
This issue may be exploited by a remote attacker to gain access to the system or modify the configuration
This vulnerability appears when weak or known credentials are reported by the vulnerability scanner tool
Default files, such as documentation, default Servlets and JSPs were found on the Apache Tomcat Server
The following files were discovered and accessible to OpenVAS: servlet/index.html, snoop.jsp, index.html
These files should be removed as they may help an attacker to guess the exact version of Apache Tomcat
This could assist them in determining effective exploits as well as provide additional useful information
A warning that you are allowing anonymous access (no user-specific accounts required) to your file server
This requires additional context, since this may be by design, such as for a repository available publicly
OpenVAS dicovered that it had the ability to login to the remote FTP service without any authentication
Data is being transmitted in cleartext. There's no excuse for cleartext unencrypted transmission these days
And if this server is expected to handle sensitive customer data, such as PII, the degree of risk is high
OpenVAS discovered that the remote FTP service accepts logins over unencrypted sessions without AUTH TLS
The remote SSH server supports some cryptographically weak Message Authentication Code (MAC) algorithms
This leaves the server vulnerable to cryptographic attacks against the integrity of the authentication
Additional information about the vulnerability can be obtained by clicking on its name, click on Ghostcat

Scroll down to the Reference head to view the associated CVE then click the corresponding link for the CVE
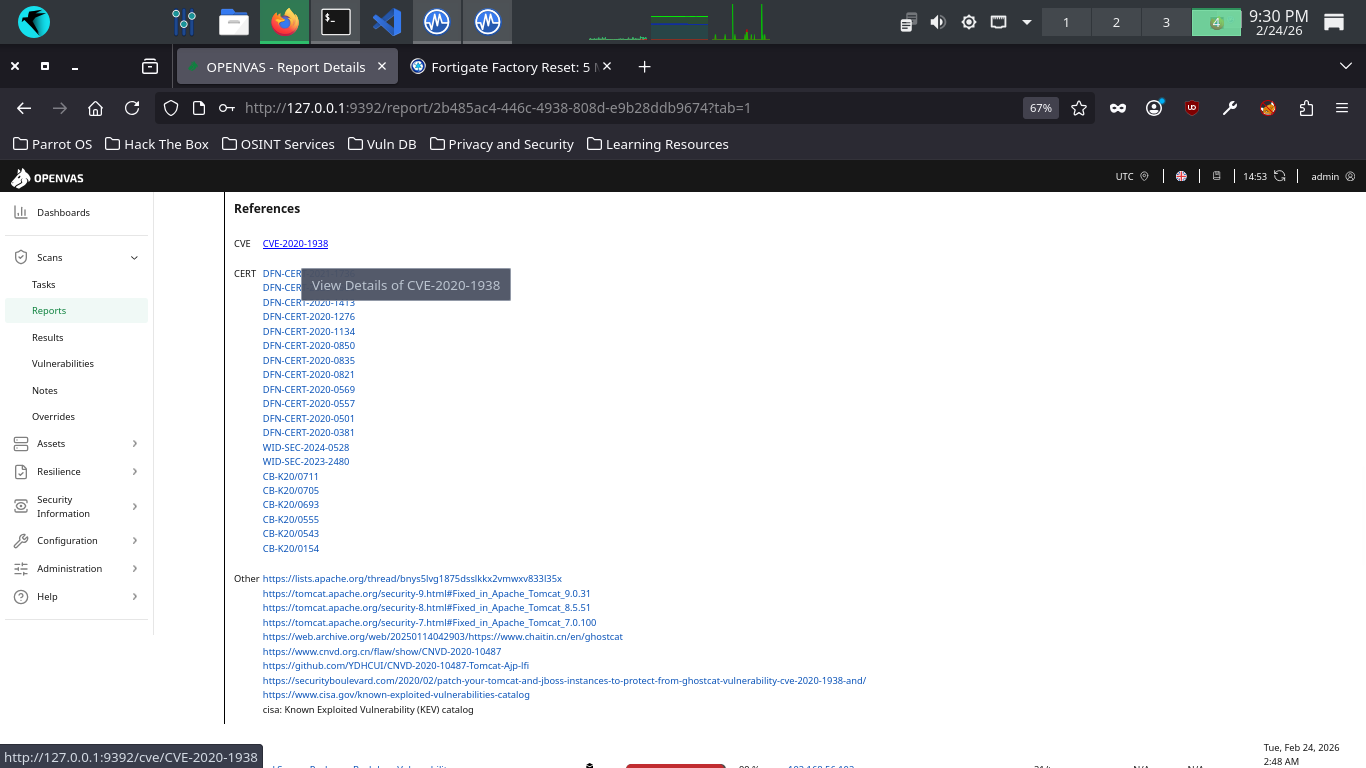
The CVE page may take a few seconds to load. This is the official description of the Vulnerability in NVD
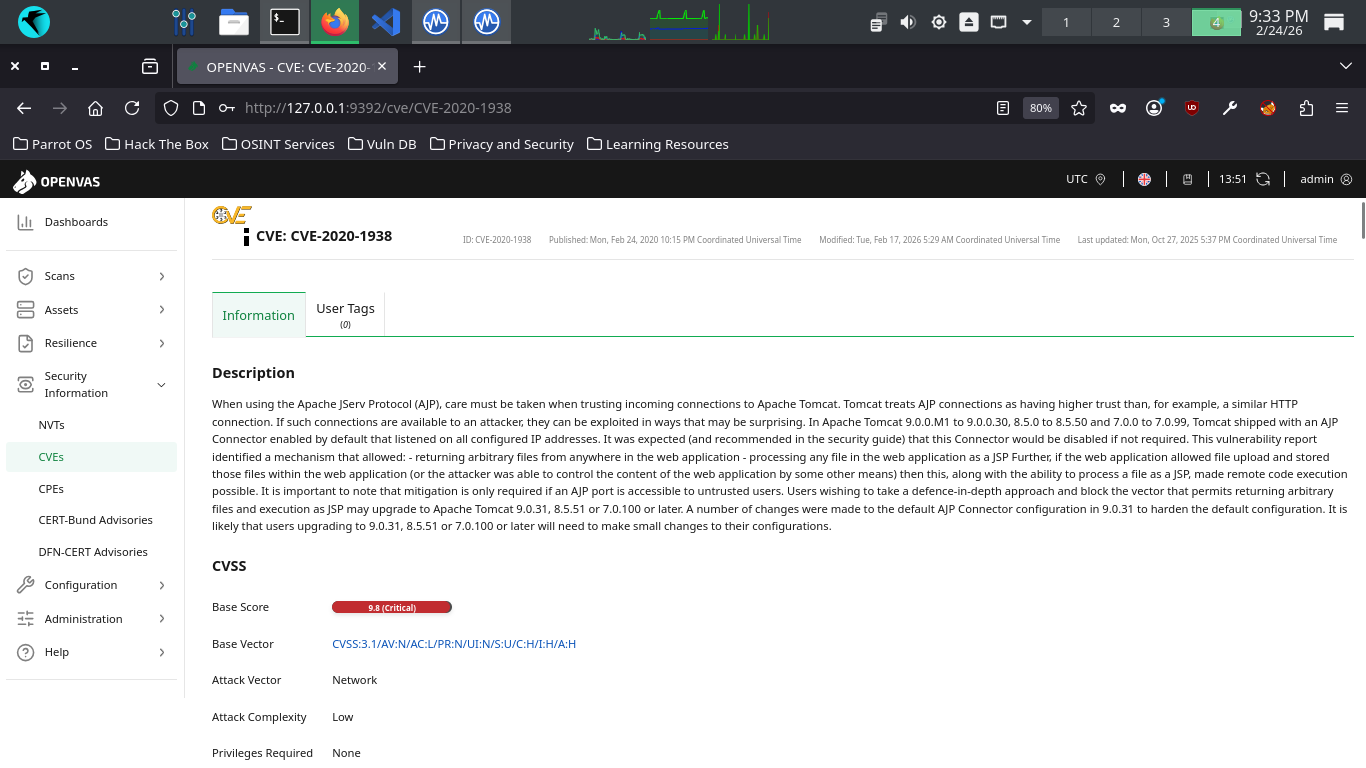
You do not need to absorb all the details, but there are some important qualifying bits in there such as:
"If the web application allowed file upload and stored those files within the web application (or the attacher was able to control the content of the web application by some other means), then this, along with the ability to process a file as a JSP, made remote code execution possible."
Actually, Ghostcat is technically a local file inclusion (LFI) vulnerability, which allows opening files
on the local server in the context of the application. As noted in the passage above, RCE is only possible
if the attacker is also able to upload their own malicious files to the server (the inclusion of which can
provide them RCE). This would be an important criterion to validate before determining the risk that this
vulnerability poses. That sais, you've already seen several vulnerabilities related to that file transfer
(FTP software installed on this machine, so it's very possible that you can satisfy that criterion. But
the point is, it's important to consider the possible interactions available and overlap across portfolios
Let's check out one more, navigate back to Scans > Tasks > DebianScan Report > Anonymous FTP Login Report
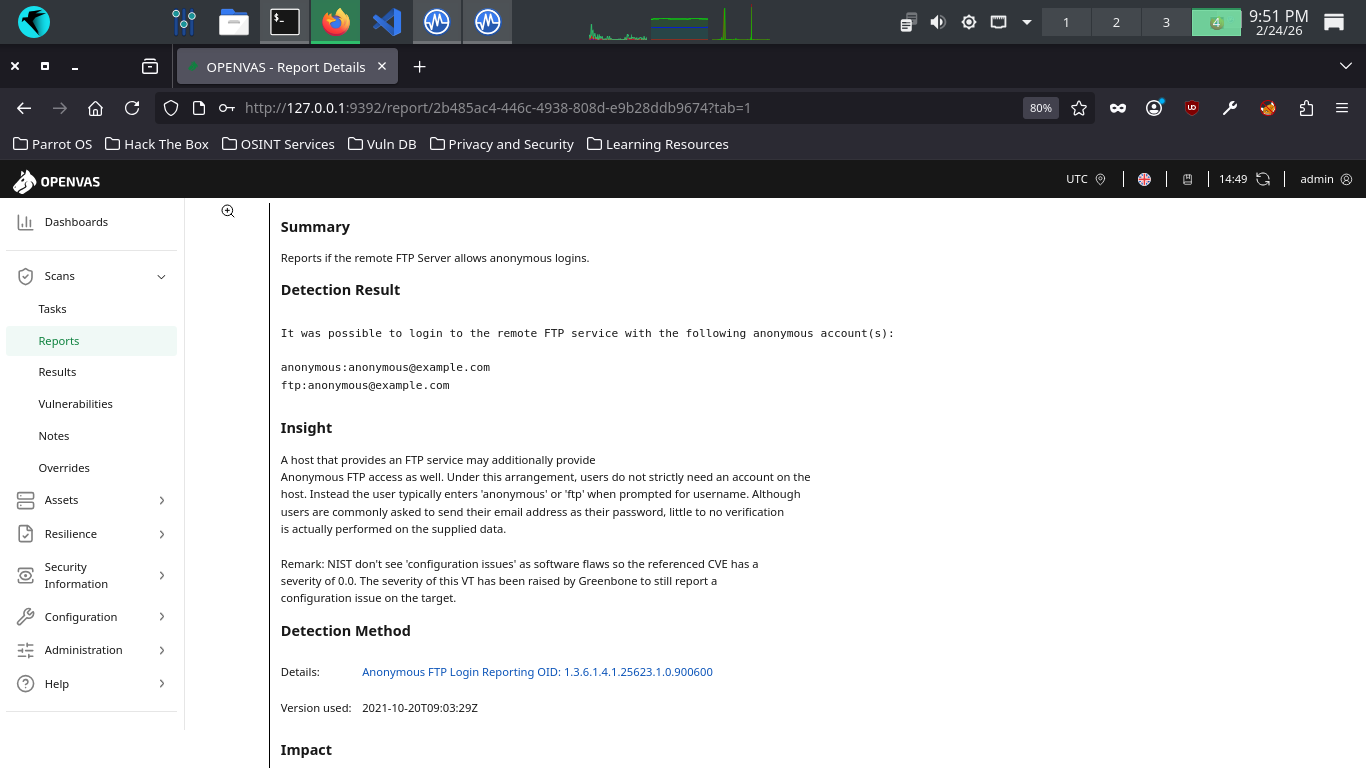
At the bottom, under References, you'll see this vulnerability is tied to a CVE. However, if you look at
the insight provided, you'll see the CVE is assigned a severity of 0.0, because it is actually considered
a misconfiguration issue rather than a software flaw. While the CVE itself has a null severity ranking,
OpenVAS has called this medium severity to draw attention to the potential impact (depending on threats)
If anonymous logins are not intentional, and provide access to some sensitive data, then brace for impact
We've talked about vulnerabilities, vulnerability scanning, and analyzed a report. Let's run a deeper scan
8. Recreate Vulnerabilities w/ MacOS
You made it! Now it's time for us to run a higher level scan. First let's build a vulnerable envornment
MacOS is a proprietery UNIX-like operating system which has been marketed and devloped by Apple since 2011
As this operating system is used in all modern Apple Desktops. This represents the third major OS target

Run the following command from the Parrot Security Terminal to download a virtual image for Mac OS X 10.4
[itlabcenter@parrot]-[~]
$wget -O macosx.vhd "https://archive.org/download/mac104-tiger/Mac%20OS%20X%20Tiger_1.vmdk"
From Virtualbox, click new, then fill out the information below, then uncheck Enable EFI under hardware
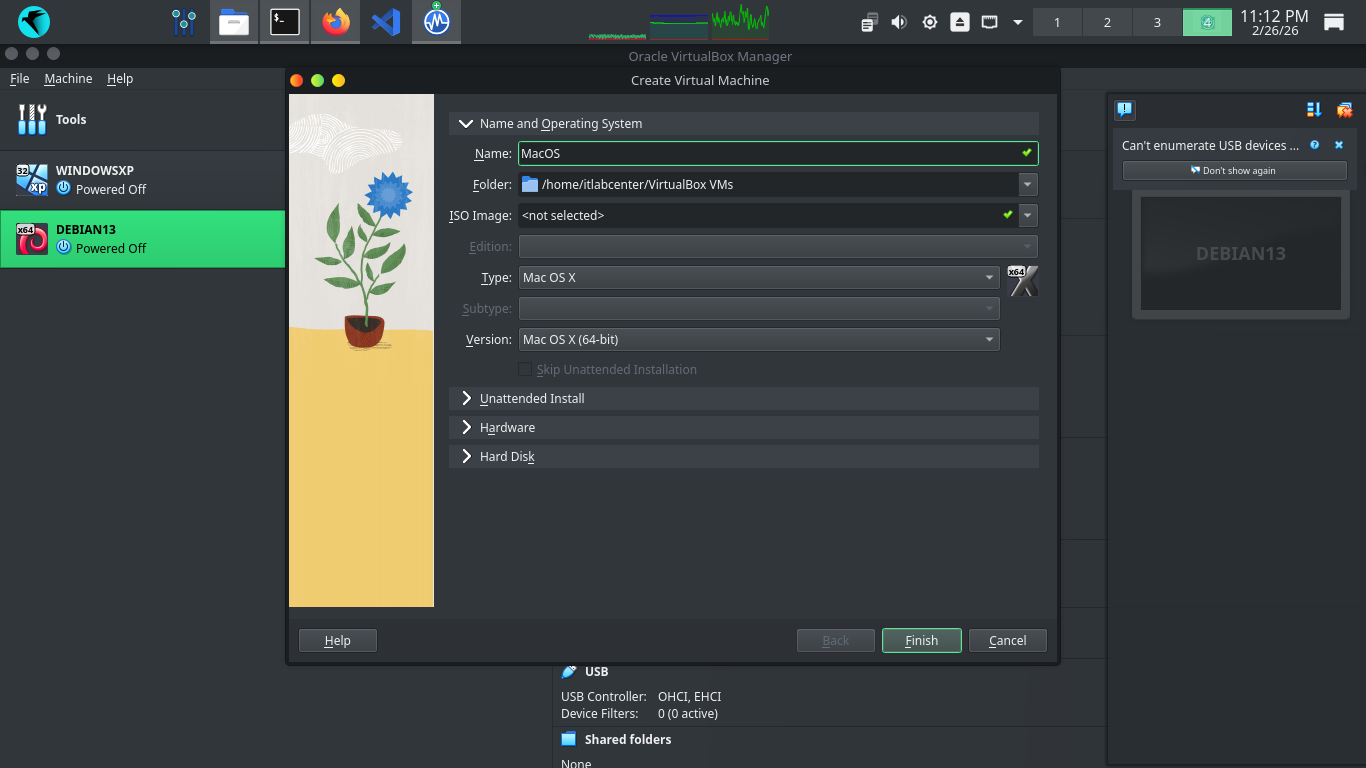
Next head to Hard Disk > Use an Existing Virtual Hard Disk File > Add > .VDMK and select our macosx.vdmk
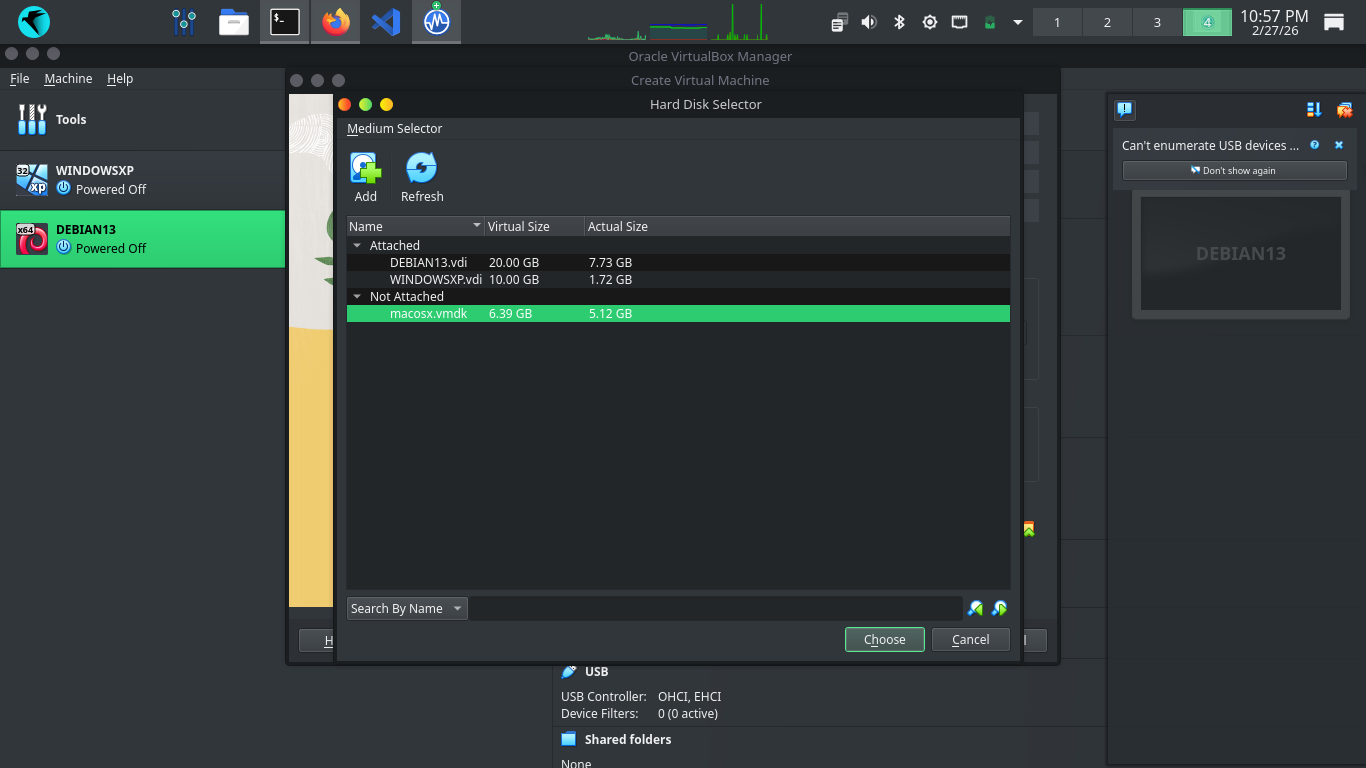
Hit Choose, then hit Finish to add our Virtual Machine. Head to Settings > Type > and set type to PIIX4
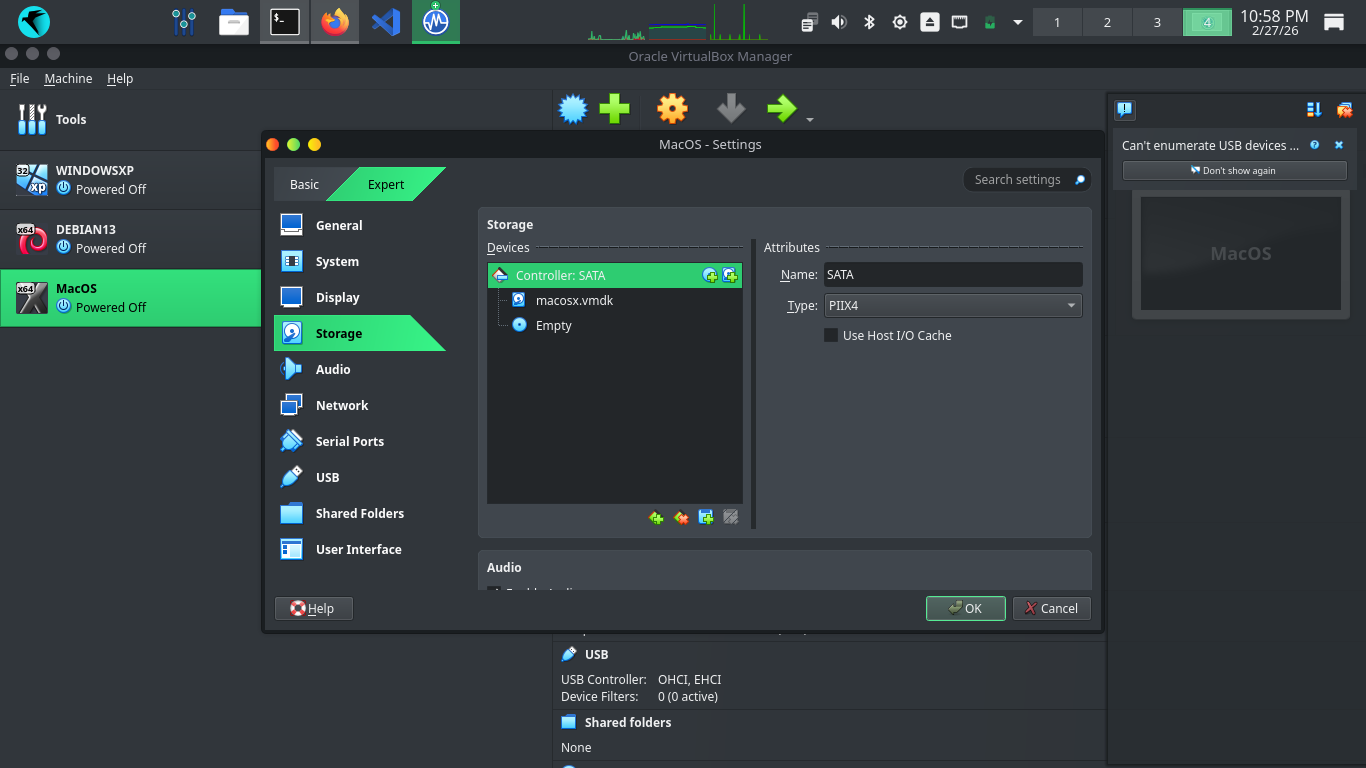
Now head to Display and set your VRAM to 128GB, hit ok and then hit start to boot up our virtual machine
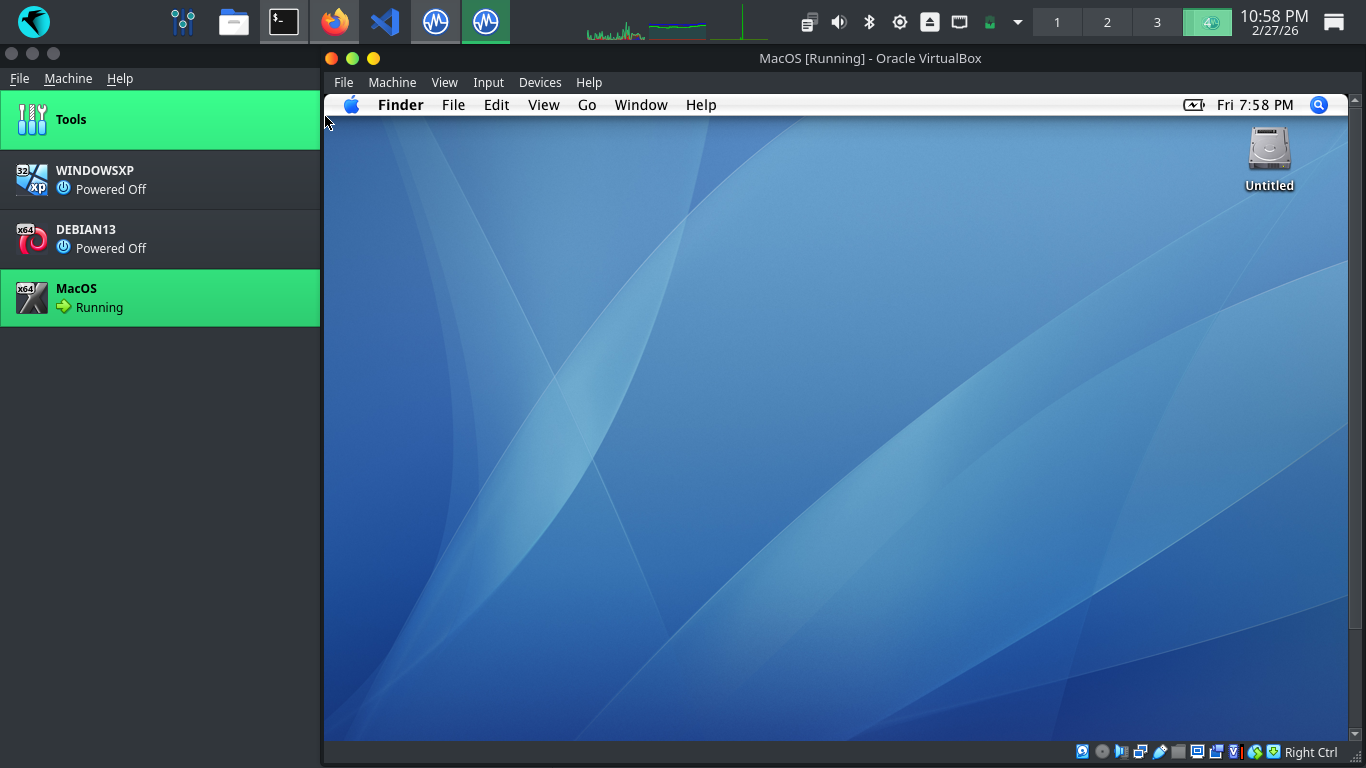
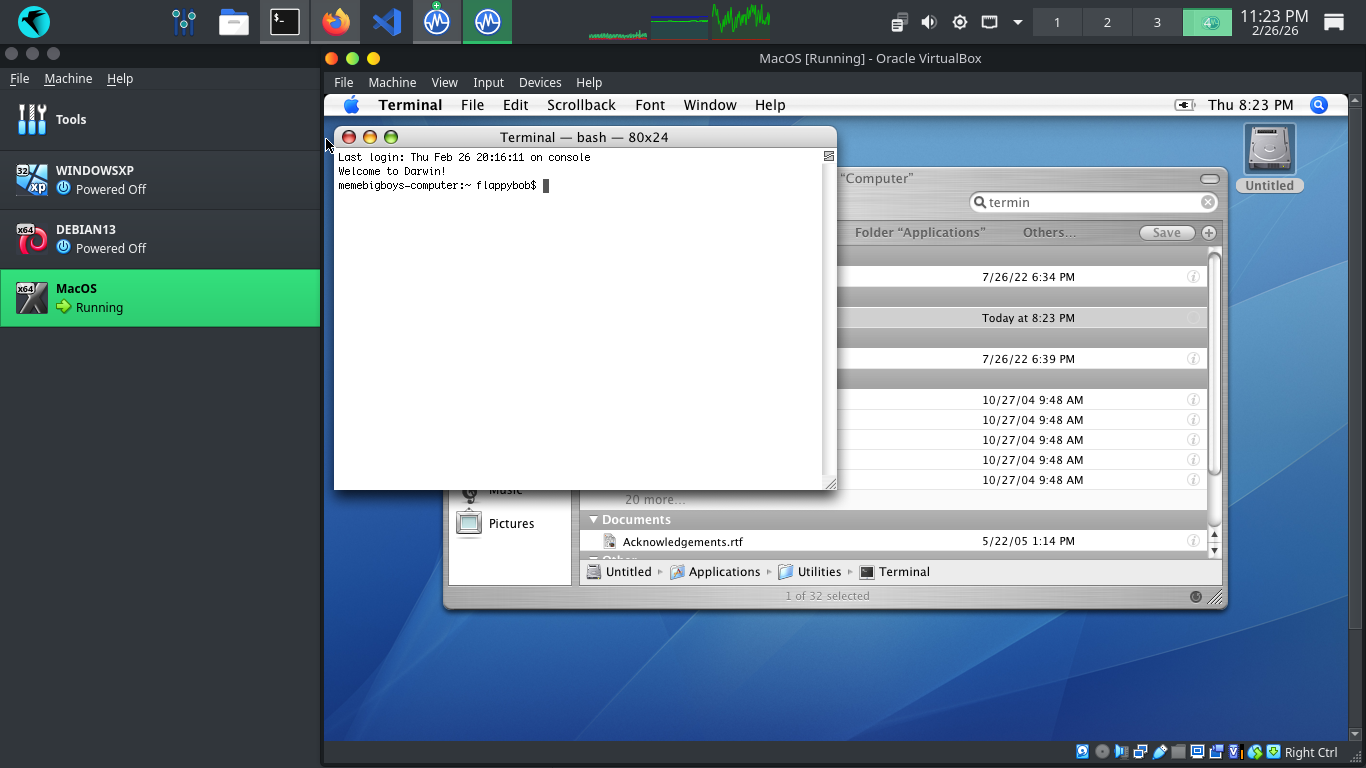
Double click the untitled hard drive and head to Applications, then search for Terminal and open Terminal
We must enable network connectivity, Search for Safari and open it, then click on the network diagnostics
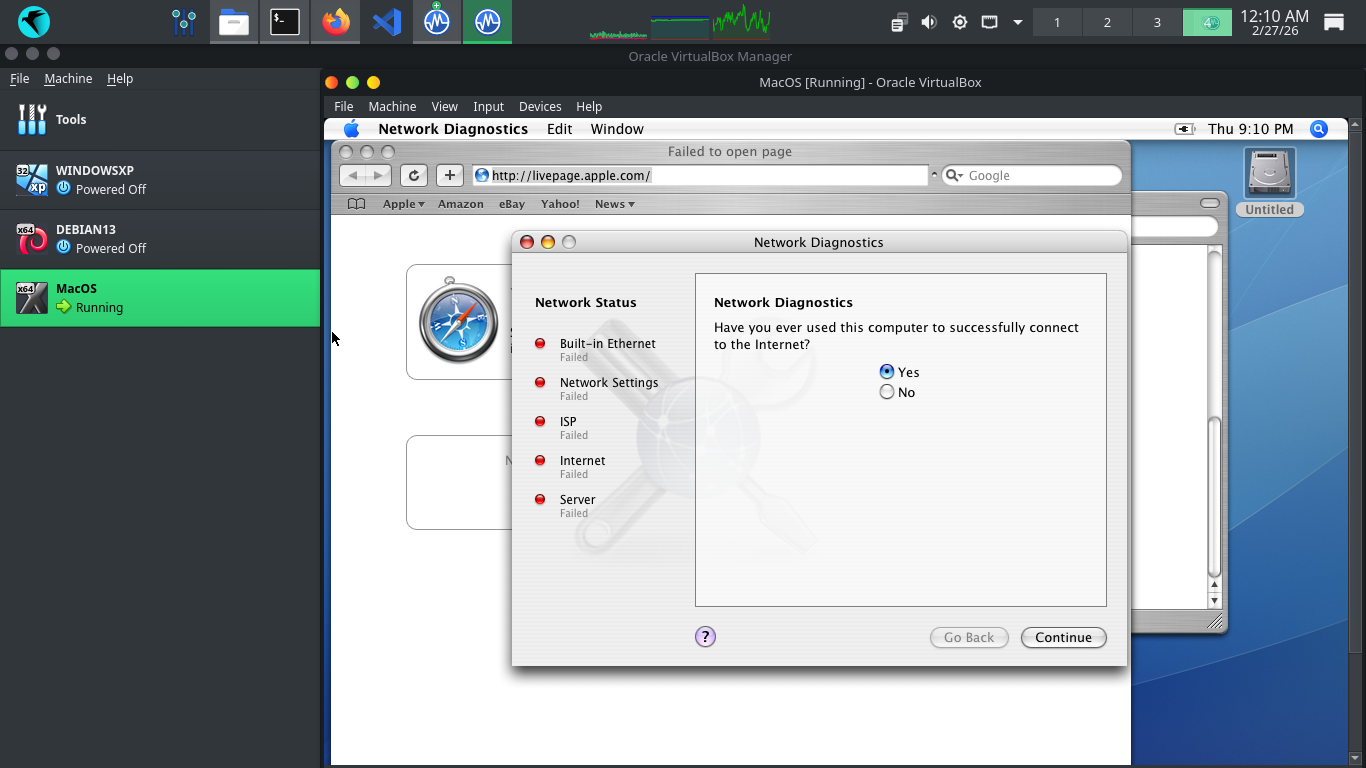
Hit No > Continue > Open Network Assistant > Continue > Connect to my local area network (LAN) > Continue
Run the following command from the MacOSX Terminal to test the MacOS virtual machines network connectivity
vbox:~ flappybob$ ping -c 4 8.8.8.8
Resulting Output:
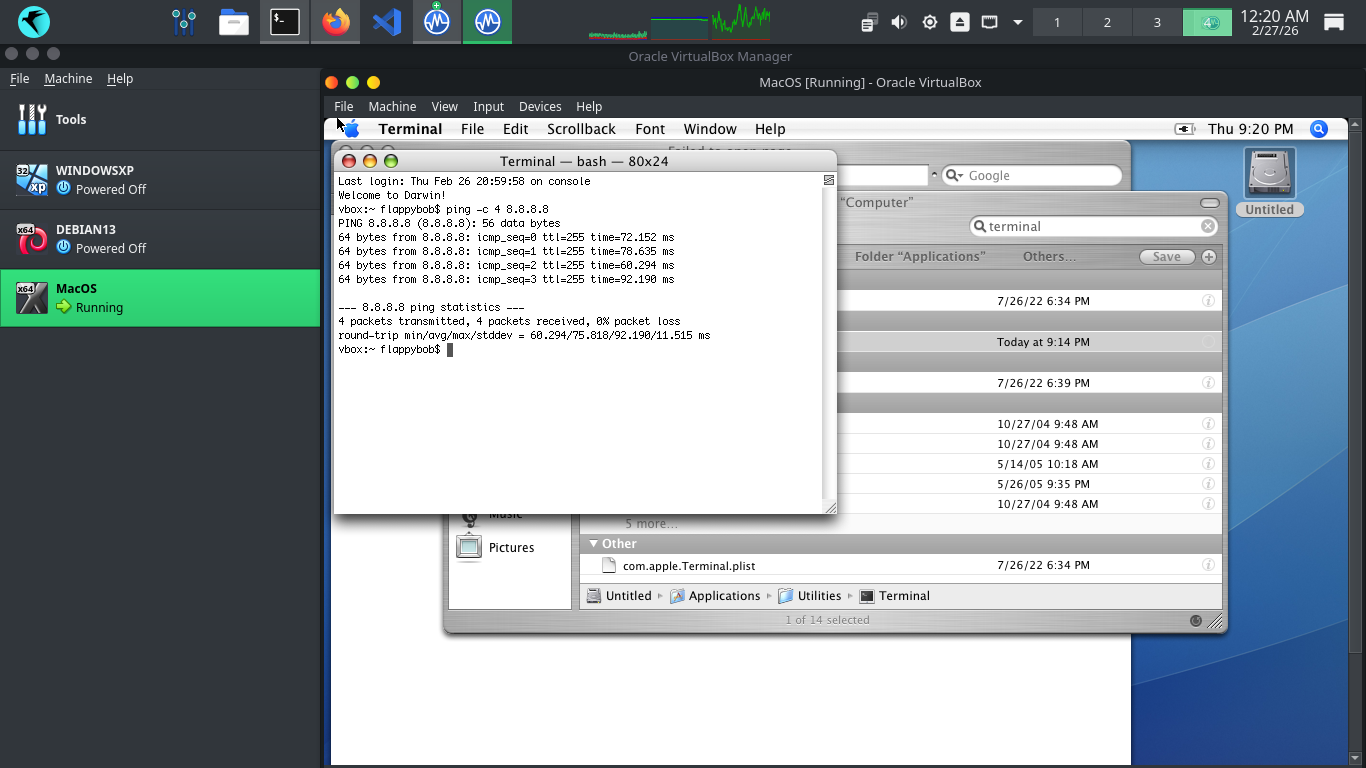
Now that our machine has established an internet connection, we can begin building vulnerable environments
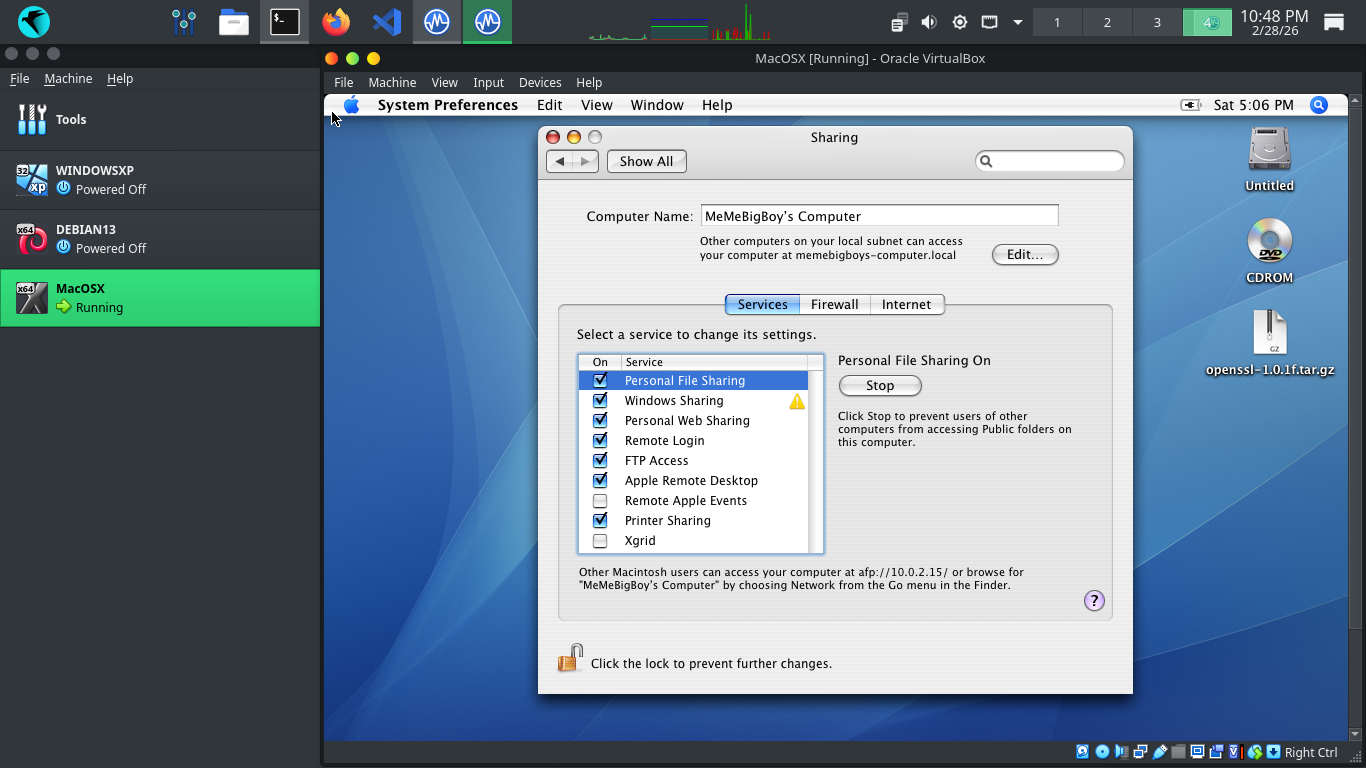
Hit the Apple logo in the top left corner > System Preferences > Sharing > Personal File Sharing > all On
We will certainly test these. But first we need to configure the VM to talk to the host operating system
From Virtualbox click MacOS on the left, then settings > network settings and attach to Host-Only Network
Before running our scans we need to verify connectivity, run ifconfig from Mac OS X to show the IP Address
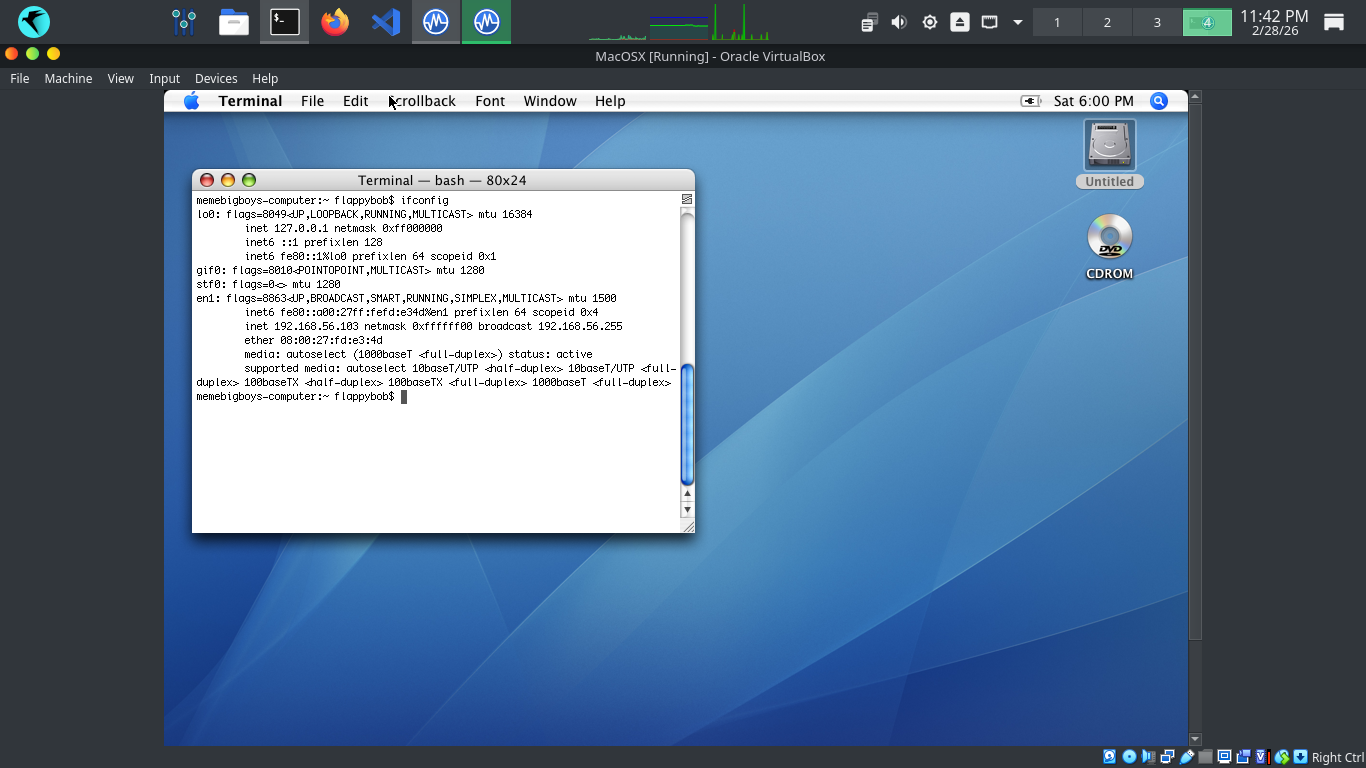
Run the following commands from the Parrot and MacOS Terminals to ping each other to test our connectivity
[itlabcenter@parrot]-[~]
$ping -c 4 192.168.56.103
membigboys-computer:~ flappybob$ ping -c 192.168.56.1
Run the following command from the Mac OS X Terminal to disable the Energy Saver system timeout feature
membigboys-computer:~ flappybob$ sudo pmset -a sleep 0 displaysleep 0 disksleep 0
Resulting Output:

Head to 127.0.0.1:9392 in your firefox browser and login with the credentials admin, admin to view our GVM
On the left expand Scans, then head to Tasks. From here click the New Task Icon in the top left > New Task
We are going to run another scan against this host, here are the configurations, leave others as default
• Name: MacOSScan
• Scan Targets > Create a new Target > Manual > 192.168.56.103
• Scan Targets > Create a new Target > Port List > All IANA assigned TCP and UDP
• Schedule: Once
• Scanner: OpenVAS Default
• Scan Config: Full & Fast
Now click save, afterwards you will see our newly created scanning task displayed at the right and bottom
Hit the start button at the lower right to begin the OpenVAS Vulnerability scan, the dashboard will change
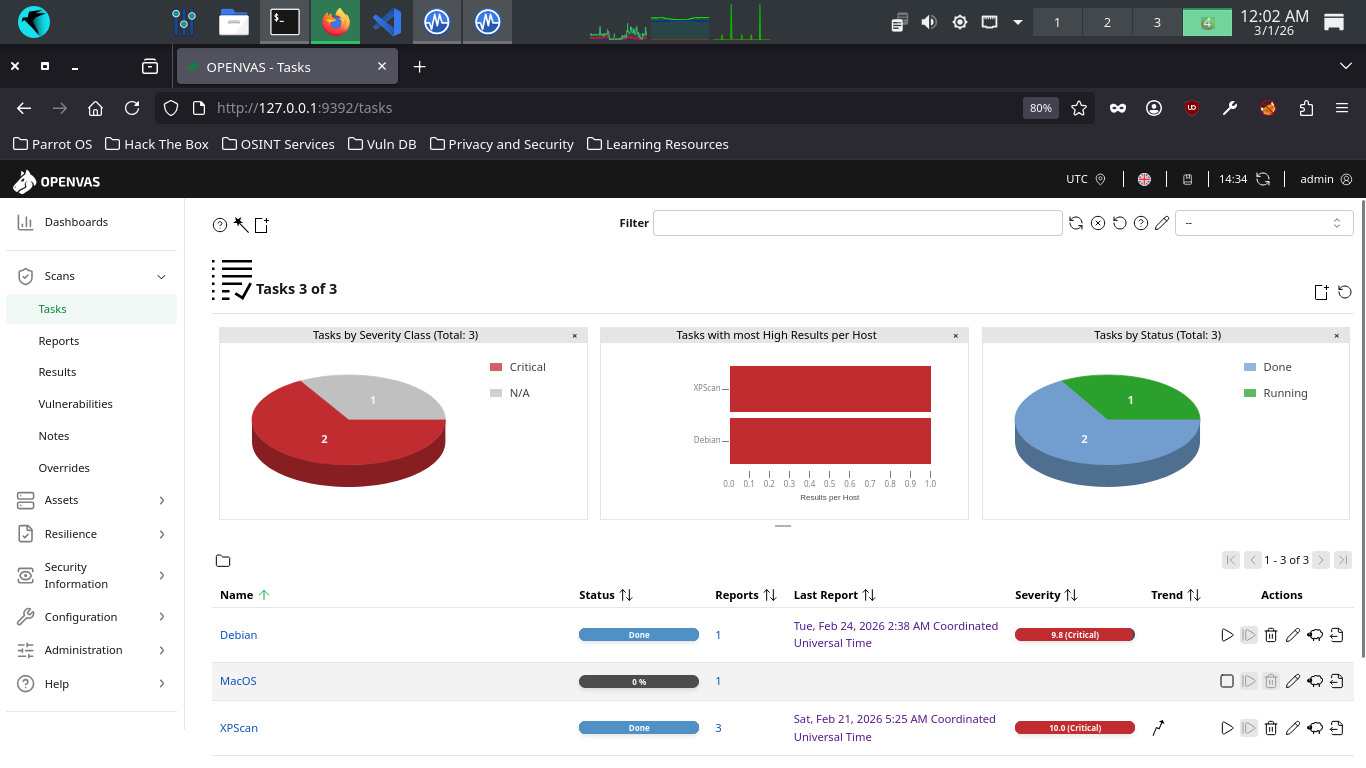
he scan will take approximately 60 minutes to fully complete. Once completed the scan will change to done
9. Analyze the Vulnerability Report
OpenVAS uses Tasks to represent individual scan setups. These consist primarily of three compenents: the
name of the task, the target host(s) to scan, and the scan configuration to use which governs the NVTs
Multiple targets can be specified for each Task, enabling a batch scan on a specific group of machines
These groups can be based on the roles that the hosts serve, or on their location within your environment
Furthermore, you can elect to run Tasks manually for quick evaluations or schedule for defined intervals
From the GreenBone Vulnerability Management web interface, hit the dashboard button from the upper-left
From the Greenbone Web GUI, at the top navigation menu, expand the scans dropdown and navigate to tasks
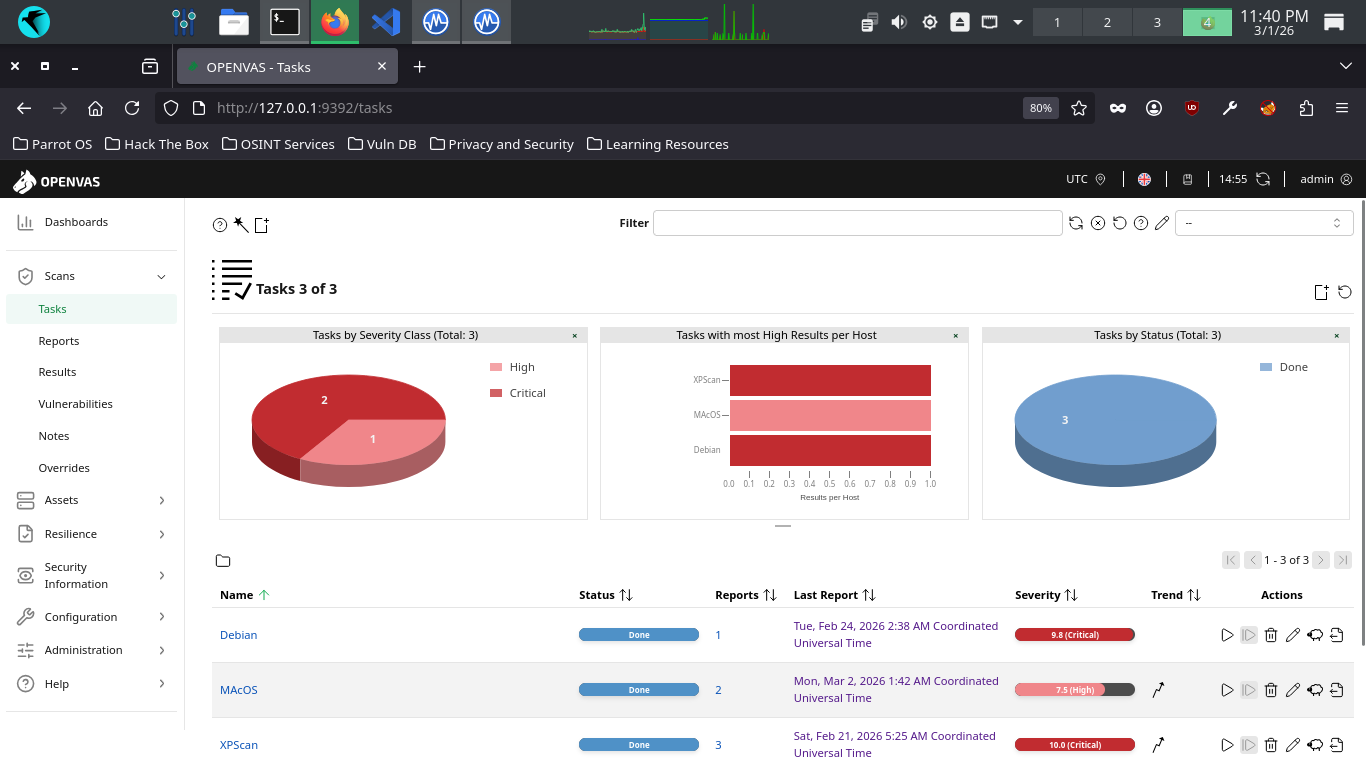
Click the dated report link, then click the results tab to view the vulnerabilities discovered by OpenVAS
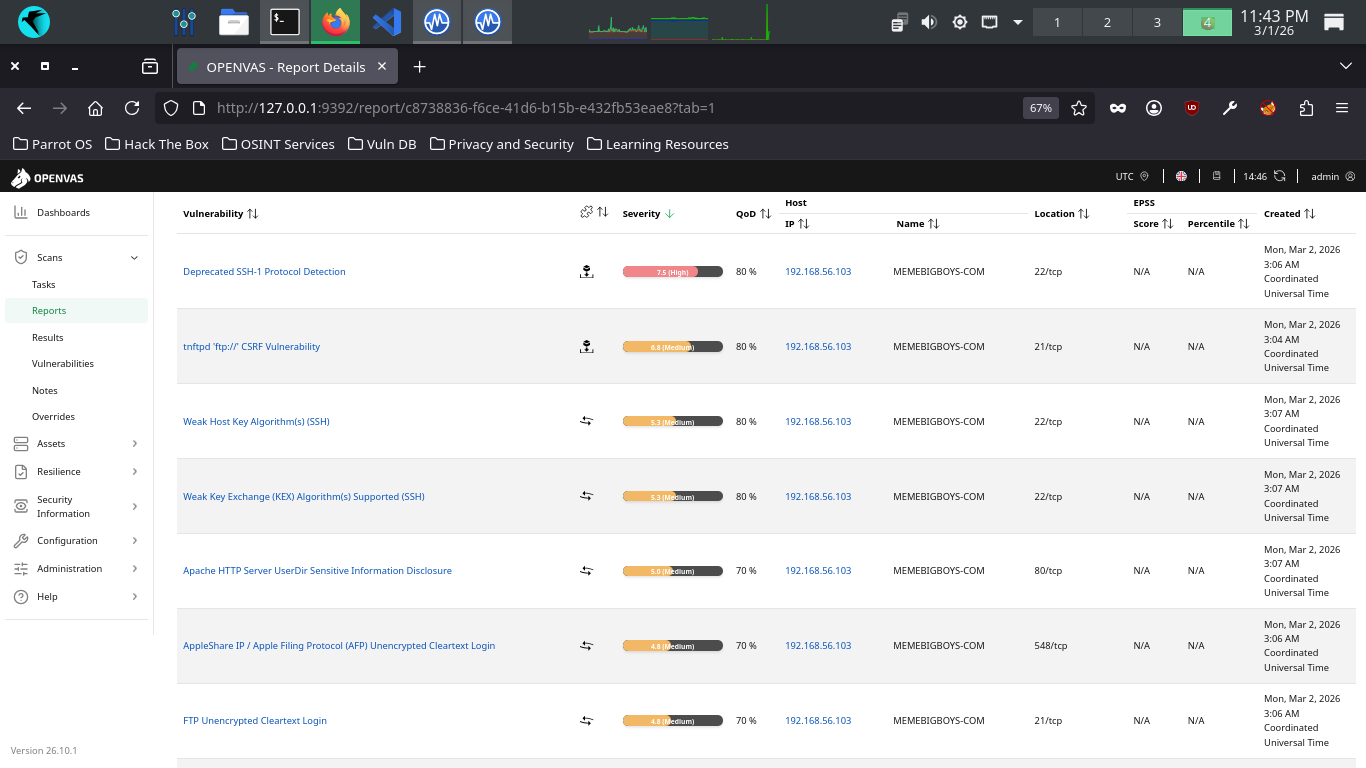
Your haul contains many great examples of vulnerability types we had not seen in the Windows or Linux scans
The host is running SSH and is accepting deprecated versions of the SSH protocal with cryptographic flaws
The SSH versions 1.33 and 1.5 were found by OpenVAS to be supported, which can be cracked with modern tools
Successful exploitation could allow remote attackers to bypass security and obtain the authentication key
OpenVAS detected that this host is running a tnftpd server which is prone to Cross-Site Request Forgery
The flaw is due to the application improperly interpreting long ftp commands as multiple seperate commands
Successful exploitation will let the attacker execute arbitrary code and perform CSRF web cache poisoning
The remote SSH server is configured to allow and support weak host cyprtographic key generation algorithms
OpenVAS detected the use of the Digital Signature Algorithm (DSA) with is weak to modern mathmatical attacks
Cryptanalysis would allow an attacker to derive the secret authentication key from the servers public key
The remote SSH Server is configured to support weak cryptographic algorithms used for secret key exchange
OpenVAS detected the use of the Diffie Hellman Group Exchange SHA1 algorithm, prone to mathmatical attacks
Successful exploitation would allow an attacker to quickly break and hijack connections to the SSH server
An information leak occurs on Apache HTTP Server based web servers whenever the UserDir module is enabled
The vulnerability allows an external attacker to enumerate existing accounts by requesting access to their
home directory and monitoring the response. Exploitation gives a remote attacker a scary amount of info
Data is being transmitted in cleartext. There's no excuse for cleartext unencrypted transmission these days
And if this server is expected to handle sensitive customer data, such as PII, the degree of risk is high
The remote host is running a AppleShare IP service that allows cleartext logins over unencrypted connections
Data is being transmitted in cleartext. There's no excuse for cleartext unencrypted transmission these days
And if this server is expected to handle sensitive customer data, such as PII, the degree of risk is high
OpenVAS discovered that the remote FTP service accepts logins over unencrypted sessions without AUTH TLS
The remote SSH server is configured to support weak encryption algorithms, easily broken with modern tools
OpenVAS detected the support for: 3des-cbc, aes128-cbc, aes192-cbc, aes256-cbc, arcfour, and blowfish-cbc
Exploitation would allow an attacker to compromise the integrity and confidentiality of all SSH sessions
A weakness has been discovered in the Apache HTTP web server if configured to use the FileETag directive
Due to the way in which Apache HTTP web server generates Etag response headers, it may be possible for an
attacker to obtain sensitive information regarding server files. Specifically, ETag header fields returned
to a client contain the file's inode number. Exploitation of this vulnerability may provide an attacker
enough information to be used to launch further attacks against the target host or network environment
OpenVAS found that our Apache HTTP Web Server is prone to a cookie information disclosure vulnerability
The flaw is due to an error within the default error response for status code 404 when custom ErrorDocument
responses are not configured, which can be exploited to expose the 'httpOnly' cookies and information
The remote SSH server supports some cryptographically weak Message Authentication Code (MAC) algorithms
This leaves the server vulnerable to cryptographic attacks against the integrity of the authentication
Additional information about the vulnerability can be obtained by clicking on its name, click the first one

OpenVAS includes any Insights it has about the vulnerability, as well as the potential exploitation impact
A solution recommendation is also provided , and in this case a common one for software, reconfiguration
Click the vulnerability name again to collapse the additional details, then head to the AppleShare details
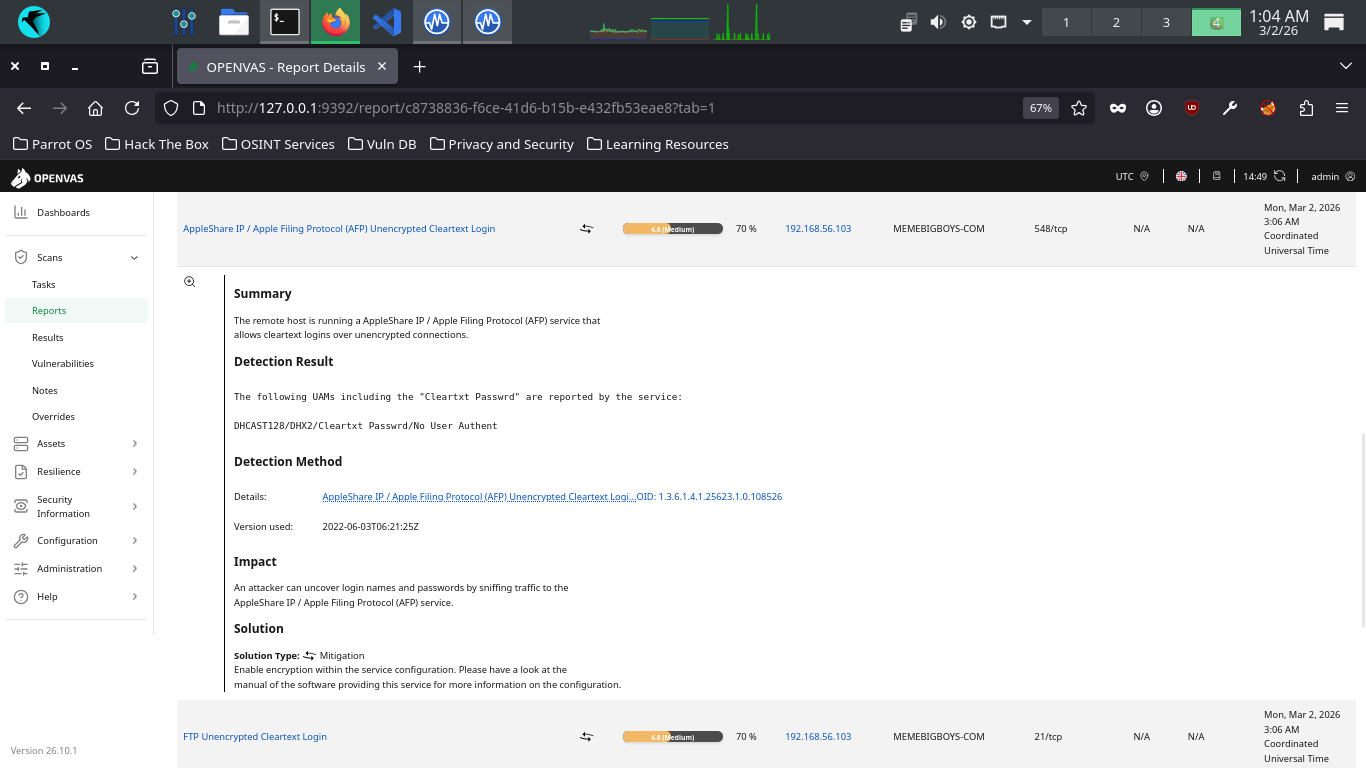
Another vulnerability regarding a lack of traffic encryption. The solution provided here is unsurprising
Enable encryption within the service configuration. Now collapse this one and head to the UserDir details
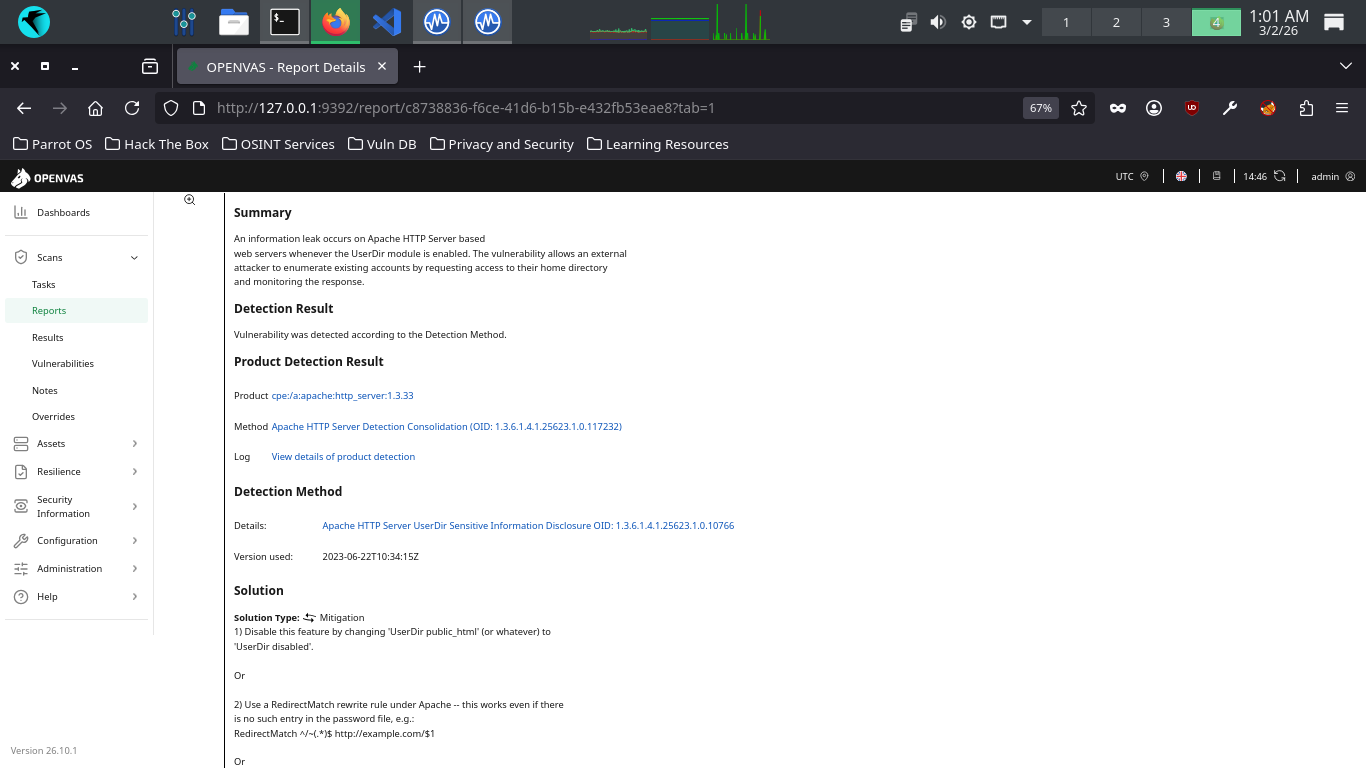
Oh good, another information disclosure vulnerability, important question being what is being disclosed?
Scroll down to the References header and click the CVE for this vulnerability, then read the description
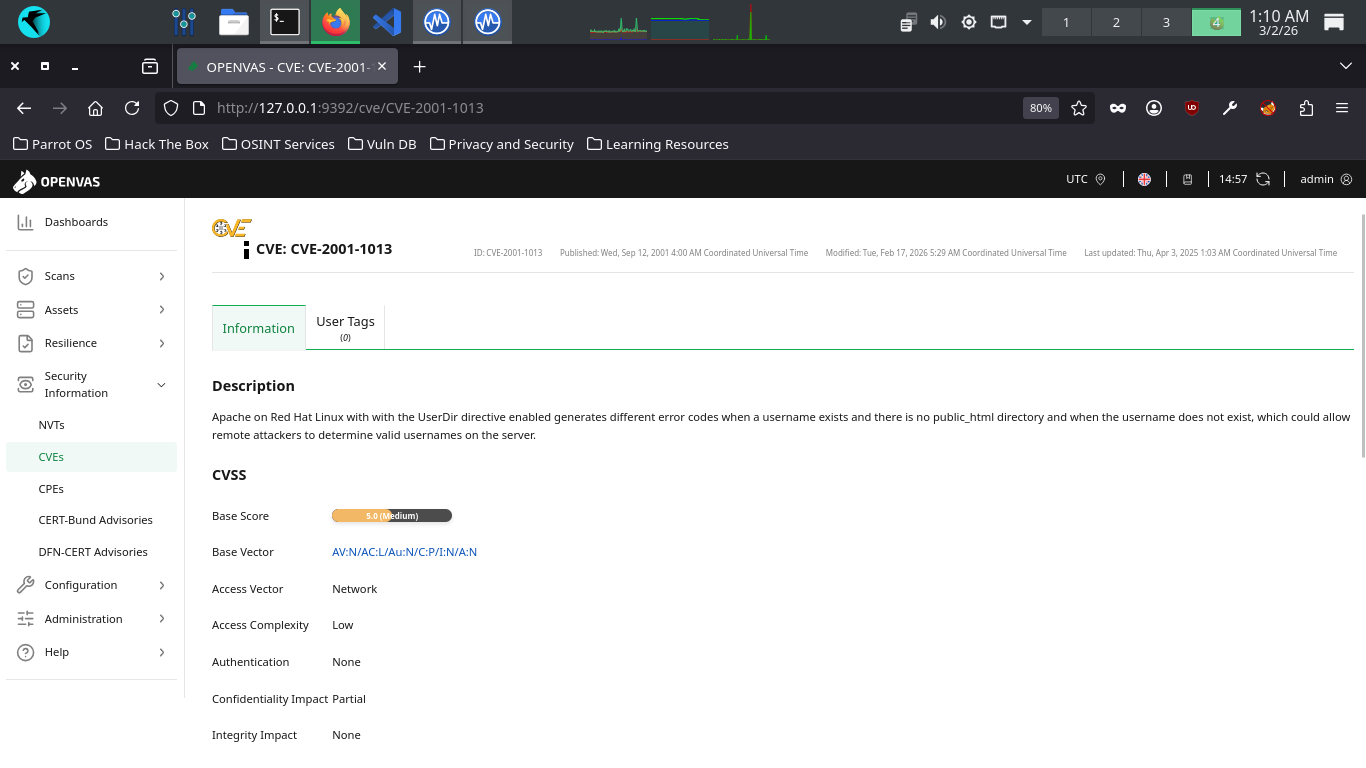
We can see that this vulnerability is specific to Red Hat Linux and it dicloses the servers valid usernames
Congratulations! You've performed your first vulnerability scan and assessed the contents of the report
This is an important first step in the vulnerability management lifecycle, take notes and you progress